Wi-Fi with the Olympus OM-D E-M1 – Intro

The Wi-Fi setup with cameras just keeps getting better and better, and the Olympus E-M1 is definitely a step up from previous cameras I’ve had (“other” manufacturer).  And while it’s not quite up to the “Nuclear option”, i.e., Near Field Communication (NFC), it’s still very quick and easy.  🙂  The best part is after you’re connected.  You can actually change several of the more important camera settings, capture images, transfer them to your smartphone/tablet, and even edit them using some of the Olympus Filters.

First, you should download and install the free Olympus O.I. Share app to your smartphone and/or tablet.  (I’ve used an iPhone and iPad, so this post will naturally be slanted towards what I’m familiar with.)  The next thing to do is enable Wi-Fi on the E-M1 in Menu > Setup Menu > Wi-Fi Settings > Wi-Fi Connect Settings > and set Private, One-Time, Select, or Off.  Most of us, most of the time, will use Private because it is the better solution, allowing easier future connections.  After Wi-Fi is enabled, you will see a small Wi-Fi icon in the upper left part of the LCD screen.  Touching this icon will start the process by showing a screen with a QR Code.

Now, setup your smartphone by going to the Olympus O.I. Share App. At the bottom of the opening screen you’ll see a small camera icon, which when pressed will take you to the Easy Setup option.  Just follow the on-screen instructions to scan the QR Code with your phones camera and your phone will then lead you through an easy install process to get things going … no need to input passwords and ID’s.  Nice and easy!  Then, go to Settings on your phone, select the E-M1 network and in a few seconds the phone should connect to your camera.

Now, back to O.I. Share and select whether you want to use the Remote Control function, Import Photos, Edit Photo, or Add Geotag.

Future sessions should only require you to turn on Wi-Fi on the camera, select it’s network from Phone Settings, and start O.I. Share.  (Once Wi-Fi is on, it can be re-enabled by pressing the small Wi-Fi icon near the top left corner of the LCD screen.)

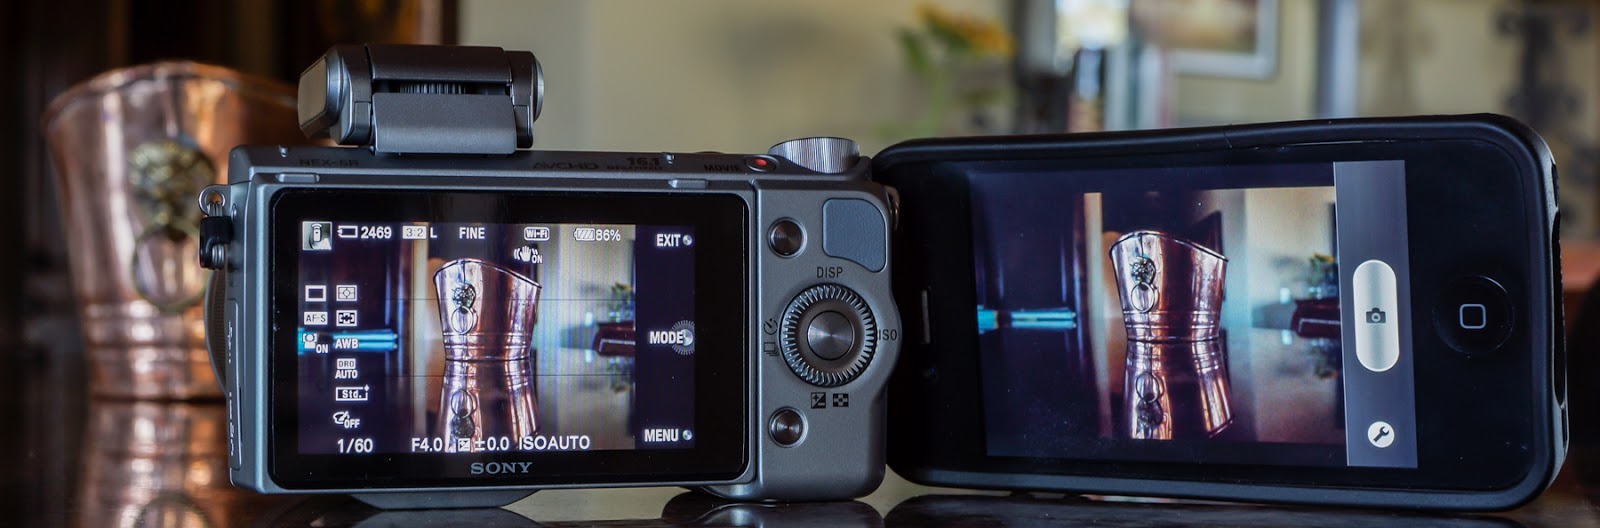
Now that you’re “smart” device is connected to the camera’s Wi-Fi network (the camera generates its own network so you can do this anywhere – no computer network needed), you merely decide what to do.  For me, I will most often use Wi-Fi to remotely take photos with the camera by using my iPhone.  It’s really a nice setup in that you can use the on-screen shutter button on your phone, or you can use the touch screen to select the focus point (and focus) or select the focus point and shoot all in one touch.  Lots of flexibility and control, there.  🙂

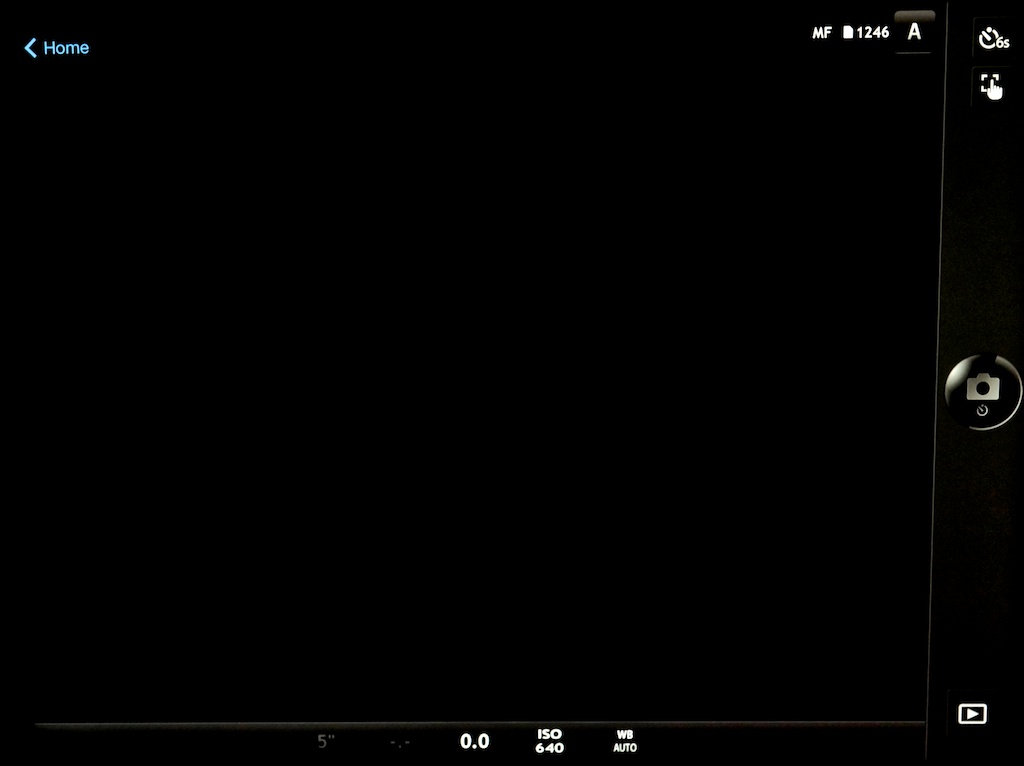
Some of the visible settings show the camera in Manual Focus, Aperture, 6 second timer, WB Auto, and ISO 640.

Some of the more important camera settings can also be changed from your phone.  These include:

  • Mode:  P,A,S,M,iAuto (camera does NOT remember this setting after you quit the Wi-Fi operation, but reverts to what the Mode Dial is set at.)

The Camera DOES remember the following settings, even if turned Off and back On:

  • Drive: Single, H, L, Timer (2,4,6,8,10,12 sec.)(Notice the extra timer settings that are Not available on the camera itself.)
  • Touch screen (Focus, or Focus and Shoot)
  • Shutter speed
  • Aperture
  • Exposure Compensation
  • ISO (full range)
  • White Balance

The operations that you can complete from your phone are:

  • Shoot
  • Playback
  • Import photos from camera (Full size JPGs,).  If you have RAW selected, it will transfer as a full size JPG and also upload via your Photo Stream (Apple) to the iCloud and then to Aperture (or iPhoto) on your Mac if that option is set.)
  • Edit photos (on your phone)
  • Geotag your photos
The “Edit Photo” functions

Personally, I think that for shooting and importing, my iPhone will work best since it is smaller and easier to carry around.  However, for serious Playback or Editing, I’m sure I would find the iPad much more enjoyable to use.

Much of the time, I think the Wi-Fi option on many of todays digital cameras is kind of a frivolous addition.  But I must say I can see times when it could also be a critical capability, especially when shooting in remote locations with a need to be able to upload photos to the internet before you get back to civilization and a networked computer.

How about you … do you like it?  What do you use it for?

Wireless Flash with Your Sony Nex-7 – using the Pop-Up!

The Sony Nex cameras are known for their excellent wireless flash capability.  But did you know you could make it work with the built-in Pop-Up flash?

The “normal” way to do wireless is to use at least two external Sony flashes like the older HVL-F20AM ($128) as a trigger and the new HVL-F43M ($398) as a slave. (I still haven’t seen anything to indicate that the new HVL-F20M can function as a wireless trigger.)  So there you are $526 into it … a bit expensive for my blood.

Well, I just discovered that the Nissin Di466 ($138.50 on Amazon) can function as a remote flash while using the Nex-7’s pop-up flash.  Very cool!  I actually got this flash to use with the Olympus OM-D E-M5 and it is advertised to be compatible with Olympus and Panasonic Four Thirds cameras.  On those cameras it will also work “on camera” whereas with the Sony it will not.  Still, $140 for a wireless flash “system” sure sounds better than almost $530!  🙂

One caveat:  The Nissin will not work in TTL mode like this so you must shoot in manual flash.  The camera can be in any mode that will fire the pop-up flash, but you may need to adjust the Nissin’s output.

It’s so easy, too.  Just pop-up the camera’s flash, set the Nissin appropriately and fire away.  You don’t even need to change the flash mode to wireless (actually, it’s not even available).

I’ve had the Nissin Di466 for a few months and it has worked great.  It has simple controls and excellent recharge times with good batteries (4 AAs required).  There only four buttons and three indicator lights so it’s a piece of cake to use.  There’s an On/Off Button and the Pilot Button/Light which shows its “ready to fire” status and also doubles as a test flash button.  Then there’s an exposure compensation Rocker Switch which you use to either compensate exposure or set the manual exposure value.  The other tiny button lets you switch between Auto, Manual, and Slave (two modes, S1 and S2).  With the Nex-7, I use S1 so it knows to fire when it sees a flash and doesn’t try to communicate with the camera.

There is another advantage to using this flash for wireless … it fires almost instantaneously when you press the shutter button.  As good as Sony’s system is, there is one slight problem.  When using Sony flashes in a remote operation, there is a delay of approximately 1/2 to 1 full second from the time you press the shutter until the photo is actually taken.

Good results on a budget just aren’t all that hard to accomplish if you just look around a little bit and see what’s available.

Note:  This flash will probably fire wirelessly with just about any camera and flash.  I got it to fire by just using another flash (off camera) and doing a test fire and … boom … it fired!

As always, your comments and suggestions are greatly appreciated and please feel free to “Fav”, “Tweet”, and “+1 or share” on Google+ or anywhere else.
     Thanks,
          Mike

Wirelessly Tether your NEX-5R (or Nex-6) to your iPhone

Sony-NEX-5R ready to shoot a copper pot with the iPhone wirelessly tethered. 

So you’ve got a brand new Sony NEX-5R (or NEX-6) and you own a smart phone.  Now, I bet you’re wanting to try out that “Smart Remote Control” thing by tethering your camera to your iPhone. This is such a cool capability … I know it was one of the first things I did after getting my NEX-5R. Below is an excerpt (draft) from a book I wrote about the NEX-5R and NEX-6, explaining how to get this “tethering” operation setup.
(The Ebook is available at: www.FriedmanArchives.com )
—————————

Once you’ve downloaded the PlayMemories app to your phone and the Smart Remote Control app to your camera, the next step is to setup a network connection between the iPhone and NEX. First, on the camera, select the Smart Remote Control app. Next, on the iPhone, go to Settings > Wi-Fi, where you will select the camera and enter a password provided for you by the camera (you should only have to do this once). With the camera “network” selected, start the PlayMemories Mobile app on your phone and soon the phone should see what the camera sees! Cool!

There will be a typical phone shutter button showing and a “Wrench” icon. Push the shutter button and the camera takes the photo, saving it to your phone (if you choose to). Press the Wrench icon and you are taken to a small menu where you can adjust the exposure compensation +/- 3EV, set a 2 Second timer, and choose between “Review, Save Image”, “Review Only”, and “Off”.
·       Review, Save Image allows you to review the image on your phone while also saving it to your phone.
·       Review Only just lets you review the image, but does not save it to your phone. Don’t worry, it is still saved to the memory card on the camera.
·       Off lets the phone get ready to shoot the next image with viewing or saving.

One nice thing is that you can switch back and forth between using the phone shutter button and the camera shutter button and the connection should still be fine.  Unfortunately, a “not-so-nice” thing is that every time you leave the app you first have to go back to Wi-Fi Settings, reselect the Camera, and back to your phone to reestablish the network connection and then restart the PlayMemories Mobile app.

I did get the connection to work up to a distance of about 30 feet (line-of-sight). On the down side, the whole operation, while a very cool capability, is also a bit wonky in use. Sometimes it took several tries to connect even from just a few feet. And if you leave the camera app at all, you have to go through the connection process again – except for the network password which it does remember.

Note: The camera got very warm while left in Smart Remote Control for several minutes and it seemed to drain the battery faster – nothing scientific in this – just an impression.

After the initial setup is complete, here are some basic steps for getting back into the Smart Remote Control mode: (These are iPhone instructions.)
·       On the camera, go to MENU > APPLICATION > Smart Remote Control.
·       Go to your Phone Settings > Wi-Fi > DIRECT-(series of letters)
·       Now, wait for your phone to recognize the camera network and select it.
·       On your phone, open the PlayMemories Mobile app.
·       In a few seconds the phone should see what the camera sees.
Shoot away! 🙂