E-M1 Super Control Panel is Even More SUPER, Now!

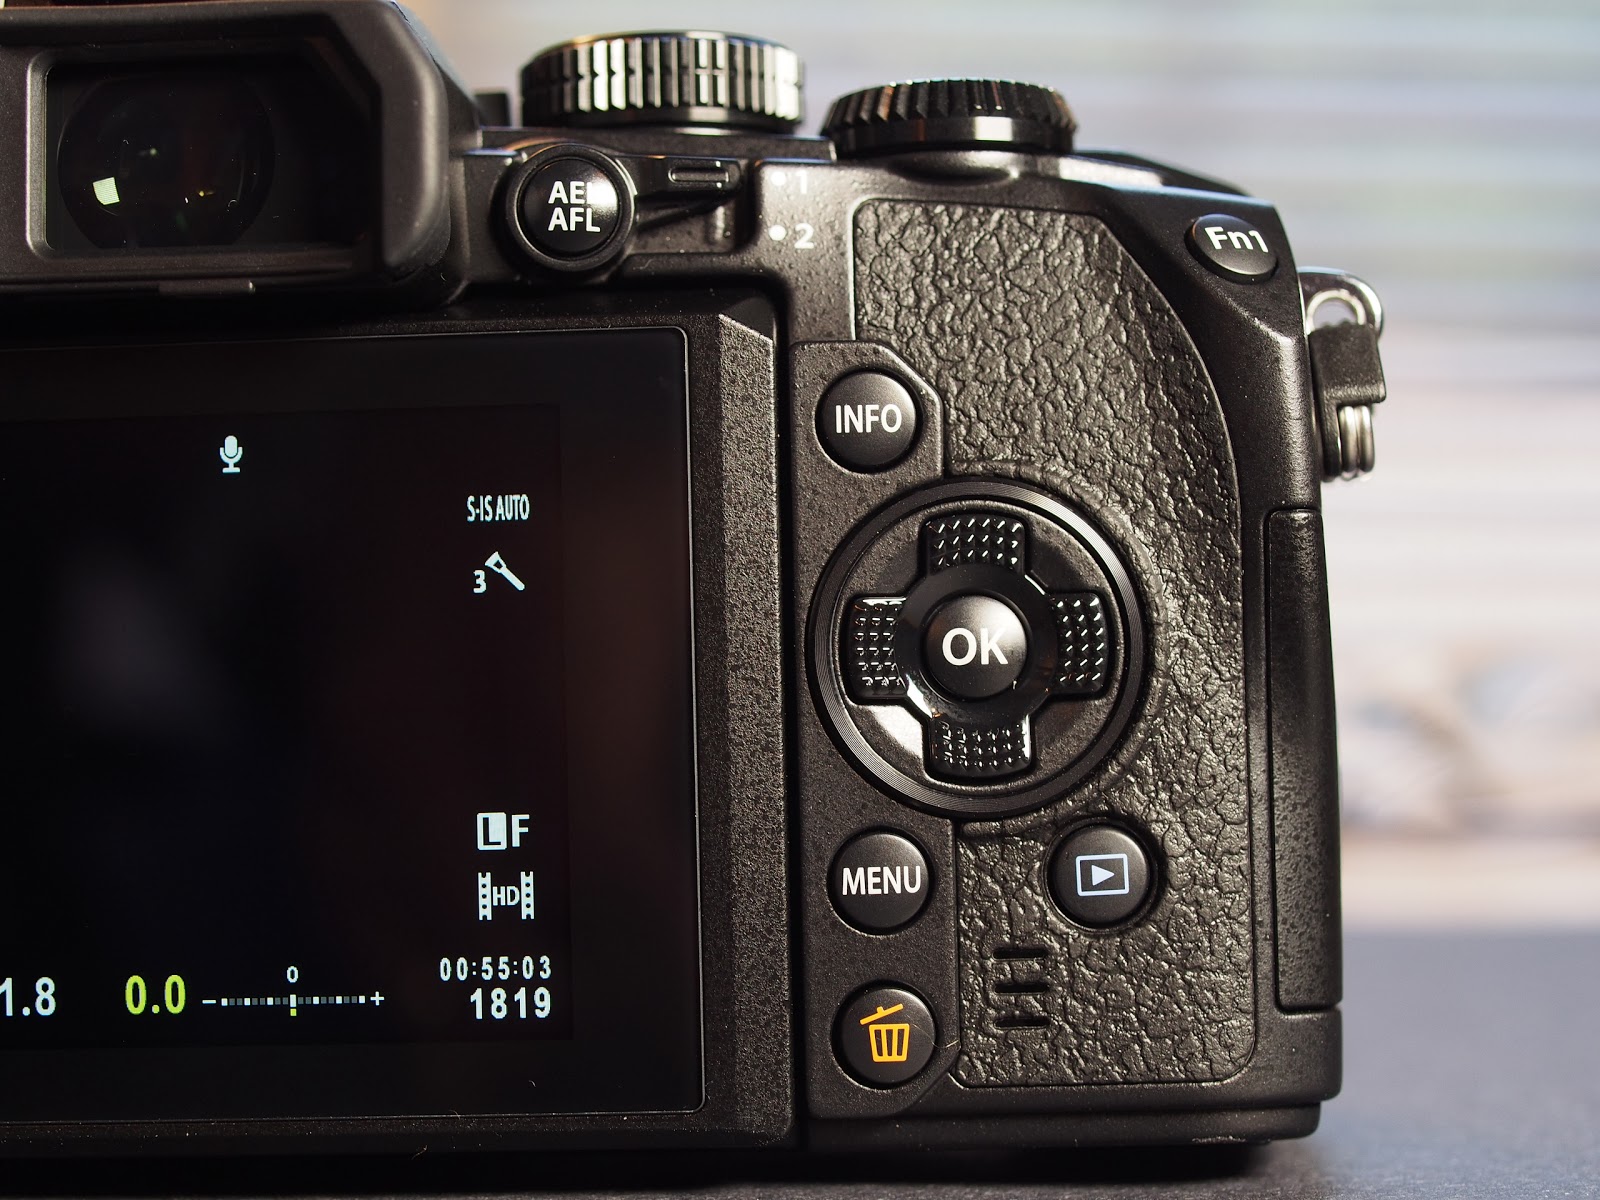
Figure 1.  Top left corner shows you information about what you have selected.

The Super Control Panel (SCP) on Olympus cameras is one of my favorite features.  It is very powerful in that it gives you one button access to about 21(on the the E-M1) camera functions to include ISO, White Balance, AF Modes, and many more.  So, why is it even “More Super” on the E-M1?  It’s that little square in the lower right corner that shows you the settings for each button on the camera … but, more on that in a minute.  First, let’s just talk about general use for the SCP.

I don’t know why Olympus doesn’t enable the SCP by default, but they don’t.  So you have to enable it by going into Menu – Custom Menu D – Disp/*))/PC – Control Settings, and here you have to enable it individually for iAuto, P/A/S/M, ART, and SCN.  And I enable it for all of them.  Oh wait … you don’t have a Custom Menu (gear icon)?  Well, that is also NOT on by default for some strange reason.  So go to Menu – Setup Menu – Menu Display, and turn on Menu Display(gear icon).
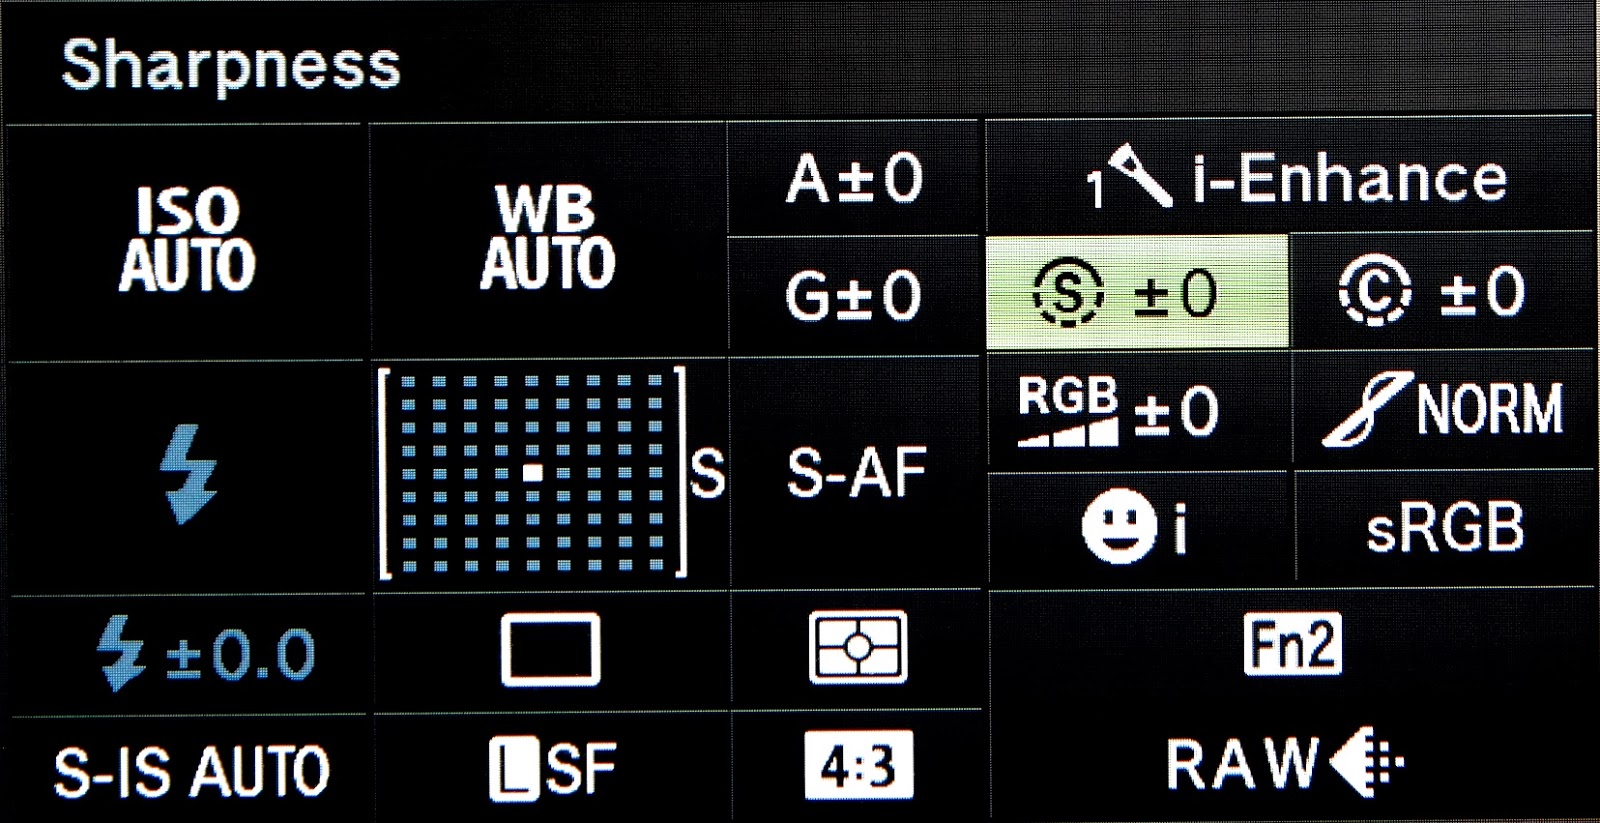
Figure 2.

Once enabled, you invoke the SCP by just pressing the OK Button while in a shooting mode (not Photo Story or Movie).  If the SCP doesn’t show itself at first, then press the Info Button once or twice until you see it.  Now, you can move around the screen with either the Rear Dial, the Arrow Pad, or Touch Screen (if enabled).  After you’ve selected the function you want to change, you can either turn the Front Dial to cycle through the settings, or press OK which will open up that functions various settings.

Figure 3.

Okay … now, we’re ready to talk about the extra “Superness” (it Should be a word :-).  On the E-M5, if you selected the square in the lower right corner of the SCP (Figure 2), you could use the Front Dial to cycle through each of your customizable buttons settings to see what you have set … kind of a nice reminder, especially at first while you’re still trying to remember what all of those buttons do.  Now, on the E-M1, press OK and you will be taken directly into the Menu system for that Button (Figure 3) so you can quickly change its action if desired.  SUPER!  🙂

Figure 4.

One more Tip:  When making changes to different functions, be on the lookout for an “Info” icon somewhere on the screen (Figure 4).  (You will only see this IF you use the OK button to select the function on the SCP.)  Sometimes, it will show up in the lower left corner, but other times it’s located elsewhere.  This important icon is telling you to press the Info Button to open up a deeper level of settings for that particular function.  In this case (figure 5), pressing the Info Button highlights the little “x2”, indicating that by using the left/right keys on the Arrow Pad you can change this setting, which tells the camera how many shots to take with this timer setting.  Very nice feature!

Figure 5.

The Super Control Panel is a wonderful time saver, keeping you out of the menu system most of the time.  Plus, it’s easy to use whether you’re looking at the LCD or the EVF, so be sure to enable this feature and save yourself some time and frustration.

For more In-Depth information about the Olympus OM-D E-M1, check out Gary Friedman’s book, available at:  http://www.friedmanarchives.com/OlympusE-M1/index.htm

Using Adapted 3rd Party Lenses with the Olympus E-M1

I included the watch just to show the small size of this lens

One of the wonderful features of small sensor, ILC (interchangeable lens) cameras like the Olympus OM-D series (and Pens), is their ability to use almost any lens ever made … IF, someone has made an adapter for it.  And luckily for us, there are already adapters out there for many of the “other” manufacturer’s lenses.

Here, I have the Voigtlander Ultron 28mm f/2 (Leica M-Mount) and I use an adapter from Novoflex, which fits perfectly.  I tried a cheaper Fotodiox Pro adpater first and, like others have discovered, found that it would not fit my camera.  BTW, a word of caution.  An adapter should fit like your lenses do … snug but not overly tight.  If it doesn’t seem to fit right, don’t push it, as I’m sure you don’t want to get that thing stuck on your camera.  🙂

Although there are a few adapters that have some electrical contact with the camera, most don’t.  So this means these lenses are purely manual in focus and f/stop, and also transmit no EXIF data to the camera.  For the E-M1, this causes a couple of additional problems … since the camera has no way of knowing when you’re turning the focus ring, it can’t automatically invoke Magnify or Focus Peaking for you.  But don’t despair because there are ways around this.  🙂

One great thing about the E-M1 is the high level of customizability, which lets you set many different functions to just about any of the external buttons.  In this case, I’ve chosen to use the Preview Button (camera front, right of the lens, lower of the two buttons), and the Movie Button (red dot, top right).  With the Preview Button set to Focus Peaking, I can easily turn it on or off without ever taking my eye from the viewfinder.  Plus, with the Movie Button set to Magnify, I can zoom in for very precise focusing AND use Peaking at the same time.  Nice!

There are a couple of things you need to know about the Magnify function.  The first press will bring up a green rectangle on the LCD (or EVF) showing the portion of the image that will be enlarged, and a second press will actually enlarge it.  Once enlarged, you can also change the magnification factor by turning the Rear Dial to set either 5x, 7x, 10x or 14x.  Once enlarged, it will stay that way from one shot to the next.  So to get out of Magnify, just press the Movie Button again; or select a different Shooting Mode, Menu, or turn the camera off and back on.  To get rid of the green rectangle, just press the OK Button on the back of the camera.

This is the simplest way to use Magnify, but there is one other more useful and slightly more complicated setup.  That is to set the desired button to Multi Function, which gives you more flexibility by letting you choose between Highlight & Shadow Control, Color Creator, Magnify, and Image Aspect.  Then when you press and hold the button and turn the Rear Dial, you can select which of these four functions you want to use the button for.

As for the Voigtlander 28mm f/2 lens … I like it!  It’s a nice focal length giving you an effective 56mm lens on a M43 camera.  It’s got lots of character with excellent color and contrast and while sharp in the center at f/2, you will need to stop down to about f/4 to get good sharpness across the frame.  This lower image was taken on the E-M1 with this lens at f/4.

Have Some Fun with Photo Story on the E-M1

Photo Story Fun Frames

Despite what you might read on the internet, it IS possible to have fun with a “Pro” level camera like the Olympus E-M1.  Even though it’s loaded with pro features like serious wireless flash, extreme customizability of the various buttons and dials, and terrific image quality, it also has some great functions and modes for just having a little fun and being a bit creative when you get the urge.  🙂 

Photo Story Standard

One of those “fun” features is the Photo Story Mode found on the Mode Dial.  Once selected, you can choose between literally dozens of combinations of effects to include different layouts, numbers of images, aspect ratio, color or monochrome, borders, etc.

You’ll find three basic sections called Standard, Speed, and Fun Frames.  The top photo here was done using one of the Fun Frames settings.  Just like it sounds, the Speed section puts the camera into a continuous drive mode and would be a good one to use for catching something or someone in action … like sports or kids playing.
Note:  If you shoot a vertical (portrait) layout using Fun Frames, the little white box with the date in it does NOT rotate.  See this image on Flickr.

The camera will allow you to separately frame each part before the shot, and using the touch screen, you can even choose which frame to shoot next.

And, if you set RAW+JPG, the camera will not only capture the Photo Story, but will also keep full sized RAW files of each separate image.  If you only shoot in JPG, then the Photo Story is all you’ll end up with.

In the Speed mode, you can either take each image one at a time or just hold the shutter button down and let the camera rip off all five (or less) images.

Now … get out there and have some fun!  🙂
Photo Story Speed

HDR with the Olympus OM-D E-M1 is Much Improved

HDR image using Nik HDR Efex and 5 exposures at 2ev.

My biggest complaint with the various mirrorless cameras I’ve used over the last couple of years has been their rather anemic HDR (High Dynamic Range) capabilities.  Generally they only offered to bracket 3 or 5 images with up to about 1ev spacing.  They’ve been getting better, but now the Olympus OM-D E-M1 has raised the bar and given us extensive HDR functions.

The new E-M1 has an awesome HDR setup.  Auto HDR is there if you want, but even better are the great options for bracketing your exposures with either 3, 5, or 7 frames at 2ev, or 3 or 5 frames at 3ev. Nice!

Out of the box, the default settings are to press the HDR Button and turn the Front Dial to choose your HDR settings.  (The HDR Button is the front half of that button on the top left shoulder of the camera.)  Olympus has gone even further by having the camera automatically set the ISO to 200 and Drive to Sequential Shooting so it will take all the desired shots with a single press of the shutter button … you don’t even need to hold it down for the full sequence.

The Auto HDR offers two settings called HDR1 and HDR2, with each of those taking 4 exposures and combining them in-camera to create your HDR image.  If you’re in JPG only, you’ll just get one exposure, the HDR.  However, if you have RAW+JPG selected, you’ll get an HDR JPG and a normally exposed RAW file.

I should mention that the E-M1 also offers an AEB (auto-exposure bracketing) mode in a separate menu (Menu > Shooting Menu 2 > Bracketing), for those who really just want to bracket the exposure of their images to make sure they get the perfect one.  The options on that menu are much more limited than the HDR options.

The above image is a full HDR image, created by taking 5 exposures at 2ev spacing into Nik HDR Efex and then back through Lightroom 5.  Below are in-camera HDR images, using HDR1 and HDR2, plus a normal exposure and a copy of HDR1 edited further in Lightroom5.

For more information about HDR with the E-M1 (and E-M5II), be sure and check out Gary Friedman’s excellent and very thorough books.
Available at:  www.FriedmanArchives.com

Normal Exposure – note the blown highlights out the window
In-Camera HDR2
In-Camera HDR1
HDR1 Edited in Lightroom5.  Cut the highlights, enhanced the shadows, and added Clarity and Saturation

Olympus OM-D E-M1 is Looking Good

E-M1 with the Olympus 75mm f/1.8 Lens

Today, mOlympus OM-D E-M1 finally arrived, but I’ve had little chance to really get into it.  However, I’m really liking what I’m seeing so far … it’s gorgeous!  Before I go any further, let me make it clear that I’m not affiliated with Olympus in any way and I spent MY money on this camera.  But, I’ll also be the first to admit I’m an OM-D “fan boy” ever since I first laid eyes on the E-M5.  Tonight, I just want to touch on a couple of my very first impressions, the improved AF and default functionality.

First, the AF with Four Thirds lenses is HUGELY improved!  I have the 35mm macro and on the E-M5 it is excruciatingly slow, racking back and forth before finally, sometimes locking focus.  But on the E-M1, it generally snaps right in, only occasionally taking an extra half second to chirp back and forth to refine the accuracy.  This is of course, the Phase Detection AF in action and it just works.

The other thing I noticed is how well the extra buttons and switches are set up to offer superb functionality right out of the box with the default settings.  Here’s what’s available with direct access:

  • HDR settings
  • Drive
  • Metering
  • AF Select
  • Exposure Compensation
  • Aperture, Shutter speed, Program Shift (depends on your shooting mode, of course)
  • ISO
  • WB (White Balance)
  • Shadow/Hi Light Control
  • Set Focus Point (Two different ways – I’ll need to decide whether to use the Fn 1 Button or direct access with left/right/up/down buttons.)
  • AEL
  • One Touch WB
  • DOF (depth of field) Preview
Plus of course there are the other standard Playback, Trash, etc. buttons.  I think I count a total of 23 total exterior camera controls.  But the beauty of it is the layout, and I think with a little time and use (for muscle memory), it will be easy to make all of these changes without ever taking your eye from the gorgeous EVF.  Where by the way, you’ll see each of these changes as you make it so there’s never any doubt what settings you’re using.

The E-M1 is a little bit larger than the E-M5, but not much.  Except for the wonderful grip they’ve added.  One thing I loved about Sony’s Nex cameras was just carrying it, and this new Olympus OM-D E-M1 is just like that.  It’s not very heavy and with the new grip it can just hang off your finger tips with almost no effort. (I ONLY do this when it’s securely strapped to my wrist with a Peak Design wrist strap.)

One more thing:  I’ve read likes and dislikes regarding the new On/Off switch, but I think it’s a big improvement.  I love the way Sony and others place it around the shutter button where it is SO easy to flick on or off as needed.  But the old way it was done on the E-M5 was a constant source of frustration for me and like the new positioning much better.  Sure it still takes two hands, but normally I’m raising the camera to cradle in my left hand anyway, so it’s very convenient.

Yeah, it’s expensive at $1400 for body only, but you get a lot of capabilities and now access to over 60 lenses from Olympus alone.  And that doesn’t count the Panasonic, Sigma, and other M4/3 lenses and a staggering array of lenses that can be added with a small adapter.

There are so many nice things about this new machine, that it is going to take some time to sort it all out, but I will … and I’ll be posting my findings from time to time right here … so come on back.  🙂

Important Info About the Olympus Rebate for E-M1 Buyers

 
Note about Olympus 12-40mm Lens Rebate!

Olympus is offering a $200 rebate on the 12-40mm lens when purchased “with” the E-M1.  EXCEPT, be sure and read this note published on the 12-40 page.  You don’t REALLY have to purchase them at the same time.

“Please note: If you already pre-ordered your OM-D E-M1, you are still eligible for the $200 rebate offer. Simply purchase the lens in a new order. This offer can be combined with the FREE FL-300R Flash or MMF-3 offer also available with the purchase of an OM-D E-M1. Rebate submission details will be posted shortly.”

Olympus OM-D E-M1 Manual Now Available

Image by Olympus

Just a very short note to let you know that the instruction manual for the new Olympus OM-D E-M1 is ready for download.  HERE.  You’ll find links to versions in English, Spanish, and French.

Soon, there should be links for a Brochure, FAQs, and Software, but those aren’t ready yet.