Sony Nex-6 (5R and 5T) Setup

The Nex-6 is still selling amazingly well on Amazon, so there must be a lot of new users out there.  If you are and you’re struggling with setting up your brand new Nex-6, then maybe I can help.  A little over a year ago, in collaboration with Gary Friedman at the Friedman Archives, we published a comprehensive e-book about the Sony Nex-6/5R/5T.  Below, you’ll find a short section from the book with a table that will hopefully clarify the available options for you.
———————————————————————
The Nex-5R and Nex-6 boast the ability to reassign (“customize”) a couple of the buttons to help cater the camera to your specific needs. Here’s where new owners get into a tizzy since there are so many options it makes the camera harder to get to know than it should be. I’ve been playing around with different settings over the past few months, and I’ve arrived at what I consider an optimal configuration – and for me, “optimal” means “My most-accessed features are only one or two button-presses away, and that for most field shooting situations, I’ll never have to access the menus ever again!
I’ve outlined those settings in the table below. The table shows all of the settings that are available for each button, the camera default settings from the factory, and the settings I’ve used for my camera.  Of course, most of you will develop your own personal settings, but this might be a good place to start.

** On the NEX-6, if the LCD screen is on the “For Viewfinder” screen, then pressing the Fn Button gives you immediate access to 16 different camera functions, which you can then change their settings. Sony calls this the “Quick Navi” screen. You can’t change which functions appear there, but it is such a complete list there’s really no need. (More on this on page 150 in my book).

# These functions are also already available with other keys on the camera’s Control Wheel.

If this helped and you’d like to see more, just head over to www.FriedmanArchives.com where you’ll find the e-book available at a reasonable price.  And even more reasonably, it comes with a money back guarantee.

Light Painting is Easy with the Olympus OM-D E-M1 (E-M5 and E-M10, too)

The Olympus OM-D E-M1 (and E-M5, E-M10) were made for Light Painting.  They give you a feature not found on any other camera that I know of, and that is Live Bulb / Live Time.  Using either of these allows you to watch your image develop in Real Time (almost like developing prints in a dark room back in the “good old days”).  And then you can end the exposure when you think it looks right.

Light Painting is not only easy but a lot of fun and it can yield some unique images for you.  Basically it entails setting up in a relatively dark location so you can use a longer shutter setting, long enough to give you time to selectively illuminate your subject to achieve your desired result.
I won’t go into details here because I wrote about it twice last year.  First using the Fujifilm X100, and later with the Olympus PEN E-PL1.  I not only talk just a little about technique but point you to some great websites about it, too.

The beauty of using this technique with the OM-D is centered in two features known as Live Bulb and Live Time.  (The settings for these two are found in Custom Menu E.)  In a nutshell, these two functions tell the camera to periodically update the live view on the LCD monitor, allowing you to track the exposure in “almost” real time.  Then when it looks right … you end it.
The menu settings allow you set the desired interval for the camera to update the live view, but keep in mind the number of updates is limited.  So you need to space them out to make sure it will cover your needed exposure time.  Also the higher the ISO, the lower the number of allowed updates.

My favorite of the two modes is Live Time for one simple reason.  It lets you start the exposure with a simple press of the shutter button and then end it the same way.  With Live Bulb, you must hold the shutter button down (or use a cable remote with locking ability) for the entire time.

Previously, getting a good exposure while light painting was a function of luck, experience, and trial and error.  Now, with the Olympus OM-D E-M5, we have a tool that can greatly shorten the learning curve and help you get the best exposure the first time.  🙂

By the way, if you’d like more about the nuts and bolts of these features (and Much more), take a look at Gary Friedman’s comprehensive new book about the Olympus OM-D E-M1, available in just a few days at The Friedman Archives, www.friedmanarchives.com

Friedman’s A7/A7R Book – Highly Recommended

A few weeks ago, +Gary Friedman  at The Friedman Archives released his new book about the Sony A7/A7R … and, yes, it’s excellent just like his previous books about various other Sony cameras.

At about 600 pages, it’s a bit bigger than most camera books, but it is filled with A7/R goodness.  🙂  As usual, Gary goes into detail about every feature, function, and button on the camera, while revealing a depth of knowledge that is rare in these types of books.  His background as a NASA engineer and long-time professional photographer give him the insights necessary for this level understanding.  On the other hand, his sense of humor and light style of writing make all of his books very readable and an enjoyable way to learn all the ins and outs of your new camera.

So, give it a look!  And if you don’t have an A7 or A7R, no problem … you’ll find books about virtually every Sony Alpha/Nex camera released over the last few years. Not a Sony shooter?  Well, there is also a recent book about the Fujifilm X100S (X-T1 on the way) and a “coming soon” book about the Olympus OM-D E-M1.

Now Available! The Complete Guide to Fujifilm’s X100s Camera by Tony Phillips!

Tony Phillips is an experienced Pro Photographer from Australia, and has written several excellent camera books.  He’s now followed those up with his latest book about the terrific Fuji X100S.  Here’s what The Friedman Archives has to say about it:

“In this 494-page full-color book you’ll learn: What every mode, button and function does – in plain, easy-to-understand text. My personal camera configuration. The secrets of taking outstanding photos. Details about the innovative features such as Real High Speed flash Sync, the ND Filter, Motion Panorama, Film Simulations, Multiple Exposures and more! All about movie mode. All about Flash and Advanced Lighting. The most common digital “jargon” and what it all means to you. A tutorial to help you get the benefits from shooting RAW. Get the most from your investment – Learn about the wonders of digital imaging and improve your photography at the same time!”

Other titles coming soon from The Friedman Archives include books about the Sony A7/A7R, Sony RX10, and Olympus OM-D E-M1.  Of course, there are also numerous other books about all of the previous Sony Alpha and Nex cameras, and some great general photography titles.  There’s a money back guarantee, so you can’t go wrong … give it a try!  On the website you’ll find easy links to sign up to be notified when future books are ready.

Setting Up the Olympus OM-D E-M1 – My Way

This is a rewrite of an earlier post I did months ago about setting up the Olympus OM-D E-M5.

I’ve updated the section on the Arrow Pad settings to reflect how I’ve changed the Lever settings.

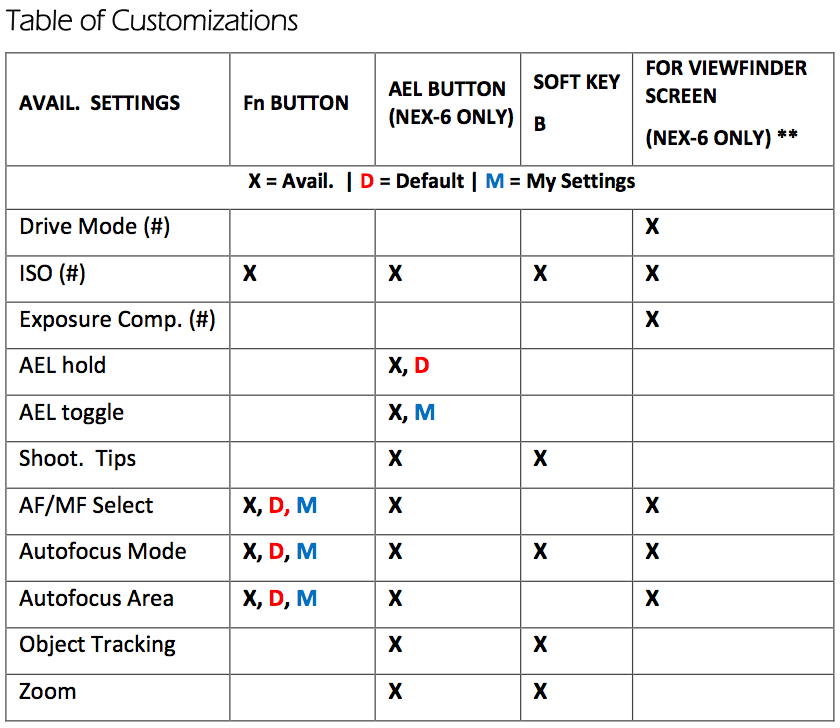
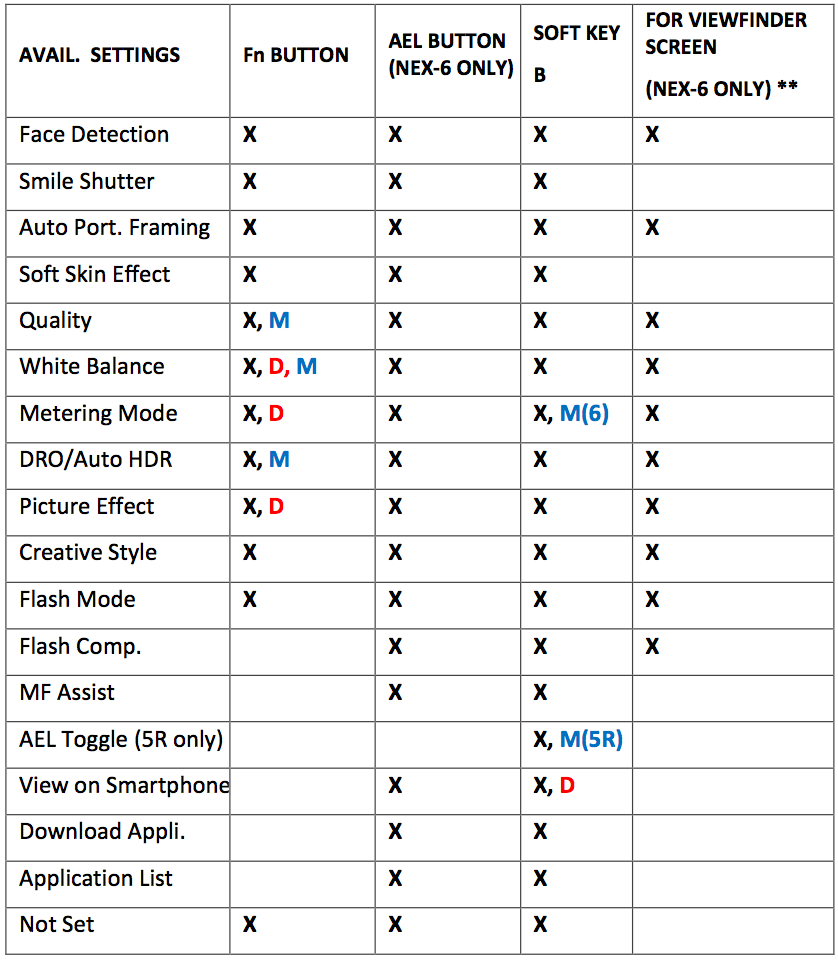
The menus of the Olympus OM-D E-M1 provide a deep, but fairly well organized hierarchy of almost all of the functions and settings that can be changed on this camera, and there are many. Some of you may feel that it is too complicated, but I think this complexity is what allows us the ability and freedom to customize this camera to our own personal taste, and that is where much of its power derives.  So while it may take a while to figure out exactly how to set it up to your liking, it’s worth the effort.

I won’t go into all of the available settings, but will cover mainly just the ones that affect the various, customizable buttons that make using the E-M1 a bit easier and faster.  So here are the buttons with my settings and reasoning for it.  It’s been said many times that “opinions are like noses” and everybody has one, so I’d be amazed if any of you set your camera exactly like I set mine … these are just a few of the possibilities.  (Speaking of which, how about one of you math whizzes telling us how many permutations/possibilities there are with six buttons and about 22 available settings for each one.  🙂  Okay, while we wait for the answer to my pop math quiz, let’s get started.

Fn1 Button = [—]HP.  I generally keep my focus set for single target AF since I prefer to choose what I want to focus on instead of letting the camera do it.  Of course, sometimes I need to move this AF point around and this setting gives me an easy way to get it back to center.  (Assuming that Custom Menu A -> [—] Set Home, is set to Single Target AF.)  If I mount an adapted lens that has only MF, then I repurpose this button to Peaking.

Fn2 Button = RAW.  Most of the time, I shoot in RAW.  However, there are some camera settings that require a JPG setting, like Monochrome for instance.  So with this button setting, I can quickly switch from RAW to RAW+JPG and back.

Movie Button = Myset 3.  Okay, this could be any of the Mysets, but #3 just happens to be my HDR preset.  A few of the other HDR settings this will bring up for me are Aperture priority, ISO 200,  RAW, and Continuous H.  I know, it’s so easy to get HDR settings from the front of the dial over the On/Off switch, but it doesn’t automatically change your shooting mode, quality, or ISO from whatever they may be set on.  One very nice thing that you E-M5 shooters will appreciate is that this is a toggle switch so you don’t have to hold it down while taking the shots.

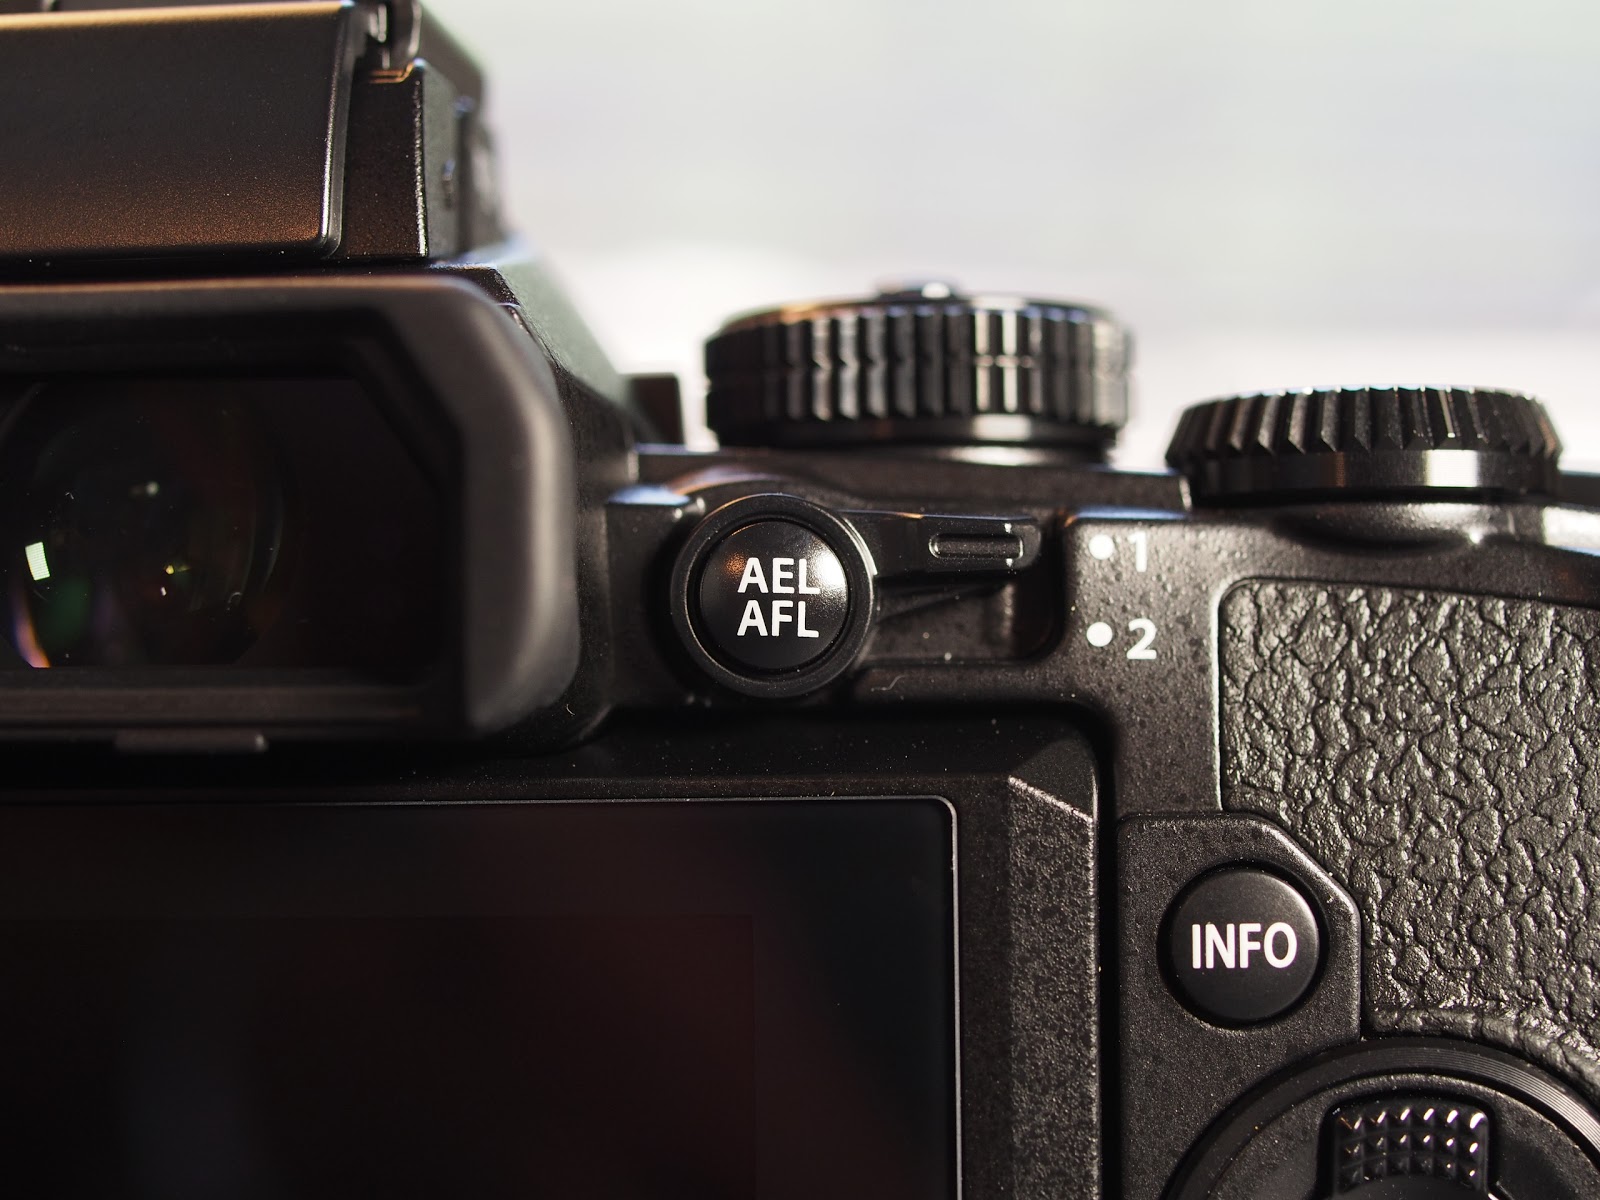
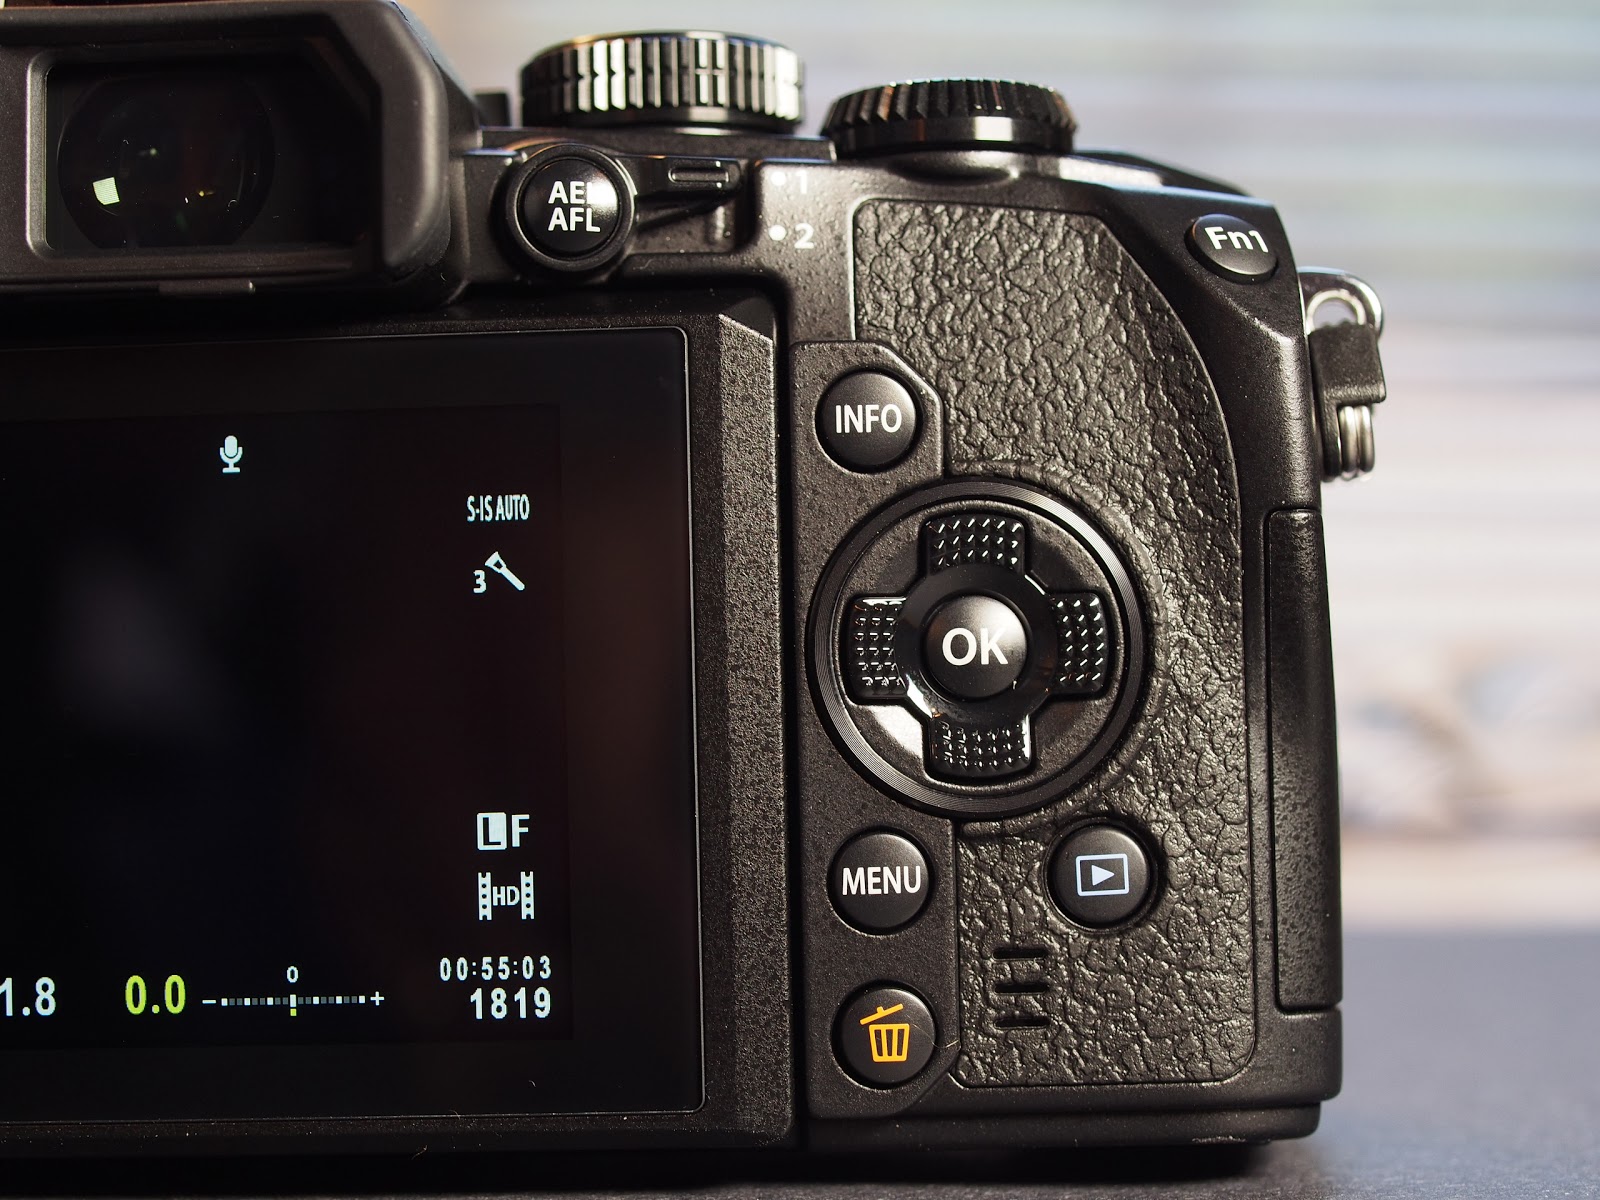
AEL/AFL Button = AEL/AFL.  Imagine that … a button that actually does what it says it will do!  🙂  I like this because in an AF mode, it acts as an AEL button and locks the exposure.  If you’re in MF, pressing it will temporarily turn on S-AF and then revert right back to MF as soon as you release it.  This is commonly known as “Back Button Focus” and can be a very nice way to shoot, even better than S-AF+MF IMHO.

Front Buttons on the right side of the lens:
Top Button = Multi Function.  By pressing and holding this button while turning either the Rear Dial or the Front Dial, you can cycle through four different settings:  Highlight and Shadow Control, Color Creator, Magnify, and Image Aspect.  I like this setting for a couple of reasons.  First, the Highlight and Shadow Control can’t be found anywhere else.  Second, when I mount an adapted MF only lens, this gives me easy access to Magnify as a focusing aid.  The other two settings are nice but are also available on the Super Control Panel.

Bottom Button = Digital Tele-converter.  This setting gives you a 2X magnification of the actual image as long as you have JPG or RAW+JPG set.  With just RAW, you will see the magnification in the display, but the recorded file will be normal.  And while the tele-converter function works pretty well (almost as good as OnOne’s Perfect Resize), I actually prefer to use it as a MF assist function since it only gives 2X instead of the minimum of 5X with normal Focus Assist.

Arrow Pad = Direct Function.  I’ve set the “Arrow Pad” keys to Direct Function. The default setting for these arrow keys is to move the AF point around, but they are “hot” all the time and I kept inadvertently moving them with my thumb.  The Direct Function setting allows me to use the Right Arrow to bring up the Flash Settings menu for quick changes, and the Down Arrow to change the ISO, which I frequently use.  Also in Direct Function, the Left Arrow will activate the AF point selector so you can move the focus point around.  Lastly, the Up Arrow activates the ability to set Exposure Compensation using the arrow keys … but this is a waste for me since I always use the Front Dial for this.  There are only seven settings available for the Arrow Pad keys:  Drive, Flash, Touch Panel Lock, Electric Zoom (for lenses that support it), ISO, WB, and Exposure Compensation.


Update Feb. 19, 2014:  I forgot to talk about using the Arrow Key for ISO.  Yes, I know … this is normally easy to access by putting the Lever to Position 2 and turning the Front Dial.  However, I too often forgot to flip the Lever back up and ended up changing ISO and WB when I was wanting to change Aperture and/or Exp. Comp.  So, in Custom Menu B – Button/Dial/Lever, I’ve set Lever Function to Mode 5, which changes the focus setting between AF and MF as you flip the Lever up and down.

Oh, and one more thing … remember that all six of those buttons have the same settings available (not the Arrow Pad keys), so you can set them up any way you want to.  Lots of flexibility and choice.

There are so many settings on the E-M1 that I could expand this post to several hundred pages, but thankfully, I don’t have to.  Gary Friedman at the www.FriedmanArchives.com has put together a comprehensive manual about every feature and function on the E-M1 with lots of detailed explanations and pretty pictures, too.  If you’re interested, you’ll be able to order the book at his website.

A few photos for your viewing pleasure.  🙂

Castle Pines Walkabout with the Sony Nex-6 and 10-18mm Lens

I was up early this morning, about 5:30am, so I grabbed my camera and headed out the door.  These morning excursions usually involve two important decisions:  First, which camera and lens to take, and second, where to go for coffee.

Today, the first was one was easy since I have a new Sony 10-18mm f/4 wide-angle zoom.  The obvious choice was the Nex-6 so I could try out the new lens.  The coffee decision, while never certain until I walk in the door of the coffee shop, ended up being the nearby DazBog coffee shop, only about 1/4 mile away.  Of course, the three Starbucks are also always likely choices since they’re even closer.  🙂 The cool morning air was refreshing and just warm enough to hint at the hot day ahead, but still just the perfect temperature for a morning stroll around Castle Pines.

After getting my first “cup of Joe” and thoroughly diluting it with cream and sugar, I settled in to take a few images with the new wide zoom.  As I shot, it occurred to me how so much of the discussion on the photo websites these days seems to concentrate on fast, sharp lenses that can give you a paper thin depth of field (dof) and thoughts about which of these lenses produces the best, the smoothest, the most pleasing bokeh.  And I don’t disagree that these are important characteristics … for “some” subject matter.  But not all.

What I discovered with this lens, especially at the widest setting of 10mm (15mm FF equiv.) and an aperture of f/16, was that the dof was almost complete.  In other words, just about everything from the front of the lens to the back of the room was in focus, and bokeh was not even a factor.  Nice!  So for interiors, landscapes, and other subjects where you want just about everything in the image to be in focus, this is a great lens.  Some may say, “the f/4 maximum aperture is too slow”.  Well, with this piece of glass, it will probably be a rare occasion to use the f/4 max and much more common to have it at f/11 or even higher to take full advantage of the huge dof.  And since it has built-in image stabilization, you could probably hand-hold this baby down to some very slow shutter speeds.  Like maybe 1/5th of a second or slower.  I’ll have to test this.

As you can tell, I’m very pleased with the lens.  And the coffee?   …… Well, it was great, too.

BTW, if you’re shooting either the Nex-6 or Nex-5R or even thinking about it, check out our e-book about these cameras at:  www.FriedmanArchives.com

Friedman Archives Posts New Video about Recent E-Book Releases

FriedmanArchives.com

Gary Friedman at The Friedman Archives has just released two new videos about the newest E-Books.  One is about the Sony A99 and the other is for the Sony Nex-6 (and 5R).

What … you don’t have either the A99 or Nex-6/5R … No problem, because there are many other books available there about virtually all of Sony’s Alpha and Nex cameras.  You’ll even find some about older Minolta and Canon cameras.

Don’t have any of these cameras?  Still no problem since there many general photography tutorials and lots of beautiful images.  So what are you waiting for … go check it out! 🙂