Olympus OM-D E-M1 Manual Now Available

Image by Olympus

Just a very short note to let you know that the instruction manual for the new Olympus OM-D E-M1 is ready for download.  HERE.  You’ll find links to versions in English, Spanish, and French.

Soon, there should be links for a Brochure, FAQs, and Software, but those aren’t ready yet.

Back Button Focusing with the OM-D E-M5

“Back Button Focusing” refers to a way to engage autofocus (AF) on your camera separately from the shutter button.  In practice, it allows you to use AF and then automatically fall back to MF to be able to expose, compose, and shoot without worrying about the focus changing when you actually shoot.  Personally, I don’t always want to shoot this way … I may want to have everything (focus, exposure, and shot) happen quickly with a simple press of the shutter button.  But for those times I do want this, here’s how I set up the E-M5.

There are many ways to set up the various customizable buttons on the E-M5, so please just consider this as a guide.  This is just how I do it and I’m sure many of you will find different setups may work better for you.

First, I go into Custom Setup (Gear icon) > AF/MF  > AEL/AFL where I set the modes for focusing to S1/C2/M3.  The numbers refer to different modes, which in this case means Mode 1 for single AF which enables the shutter button to do AEL/AFL.  Mode 2 for Continuous AF, starts focus at a half press and locks exposure and focus when the shot is taken.  Then Mode 3 for MF sets the shutter button to AEL when half pressed and then takes the shot when fully depressed.

The next step is to assign buttons for focusing and for switching between AF and MF.  So get back into the menus, Custom Setup (Gear icon) > Button/Dial  > Button Function.  Once there, I set Fn1 Function to MF and Fn2 Function to AEL/AFL.  And that’s it!  🙂

Now, when I’m in MF, I just press the Fn2 Button to autofocus (after which the camera is still in MF) and then compose and take the shot.  So the camera stays in MF, but momentarily switches to AF when the Fn2 Button is pressed.  The beauty of this is that if you need to tweak the focus, a small twist of the focus ring takes care of it. Very nice!

If for whatever reason I decide to have it all happen with the shutter button, I just press Fn2 and the camera switches into S-AF and stays there until I change it.  I would use this in more fluid situations like street shooting or maybe candids of the grandkids when I don’t want them to pose but rather try to catch them “in action”.
———————————————————————————————————————–
I’ve written previous posts about setting up the E-M5 (Customizing the Olympus OM-D E-M5), but of course that’s always a work in progress as you learn more about any camera.  Also, as you move from one project to another, your requirements may change, so flexibility is the word of the day.  🙂  However, to be able to be flexible and make the changes to your cameras setup as necessary, you must also have a thorough knowledge of what your camera is capable of and how to take advantage of those capabilities.

New Ebooks – Nex-6/5R in Spanish and Sony RX100M2

The Friedman Archives Press has just released two new titles.  One is for the Sony RX100Mk2 and the other is the Spanish translation of the Sony Nex 5R and 6 ebook.  These new releases add to an already impressive list of great books about almost all of Sony’s Alpha and Nex cameras.

Each book will guide you through every feature, function, and control on your camera.  Plus you’ll find appendices with great tips on photography and recipes for special shooting situations (Fireworks, for instance).
The books are available as a package of electronic files to include full color PDF and files for a Kindle or Nook.  Of course, you can also order a printed version in either color or black and white.
Calling All Translators!  The Friedman Archives would like to expand the available translations to other languages besides English and Spanish.  If you are fluent in two languages (one of which is English) and also have a thorough understanding of photographic techniques and terms, please send an email to Ebooks@Sent.com.

Wireless Flash with Your Sony Nex-7 – using the Pop-Up!

The Sony Nex cameras are known for their excellent wireless flash capability.  But did you know you could make it work with the built-in Pop-Up flash?

The “normal” way to do wireless is to use at least two external Sony flashes like the older HVL-F20AM ($128) as a trigger and the new HVL-F43M ($398) as a slave. (I still haven’t seen anything to indicate that the new HVL-F20M can function as a wireless trigger.)  So there you are $526 into it … a bit expensive for my blood.

Well, I just discovered that the Nissin Di466 ($138.50 on Amazon) can function as a remote flash while using the Nex-7’s pop-up flash.  Very cool!  I actually got this flash to use with the Olympus OM-D E-M5 and it is advertised to be compatible with Olympus and Panasonic Four Thirds cameras.  On those cameras it will also work “on camera” whereas with the Sony it will not.  Still, $140 for a wireless flash “system” sure sounds better than almost $530!  🙂

One caveat:  The Nissin will not work in TTL mode like this so you must shoot in manual flash.  The camera can be in any mode that will fire the pop-up flash, but you may need to adjust the Nissin’s output.

It’s so easy, too.  Just pop-up the camera’s flash, set the Nissin appropriately and fire away.  You don’t even need to change the flash mode to wireless (actually, it’s not even available).

I’ve had the Nissin Di466 for a few months and it has worked great.  It has simple controls and excellent recharge times with good batteries (4 AAs required).  There only four buttons and three indicator lights so it’s a piece of cake to use.  There’s an On/Off Button and the Pilot Button/Light which shows its “ready to fire” status and also doubles as a test flash button.  Then there’s an exposure compensation Rocker Switch which you use to either compensate exposure or set the manual exposure value.  The other tiny button lets you switch between Auto, Manual, and Slave (two modes, S1 and S2).  With the Nex-7, I use S1 so it knows to fire when it sees a flash and doesn’t try to communicate with the camera.

There is another advantage to using this flash for wireless … it fires almost instantaneously when you press the shutter button.  As good as Sony’s system is, there is one slight problem.  When using Sony flashes in a remote operation, there is a delay of approximately 1/2 to 1 full second from the time you press the shutter until the photo is actually taken.

Good results on a budget just aren’t all that hard to accomplish if you just look around a little bit and see what’s available.

Note:  This flash will probably fire wirelessly with just about any camera and flash.  I got it to fire by just using another flash (off camera) and doing a test fire and … boom … it fired!

As always, your comments and suggestions are greatly appreciated and please feel free to “Fav”, “Tweet”, and “+1 or share” on Google+ or anywhere else.
     Thanks,
          Mike

Setting Up the NEX-7 – Revisited

I recently read somewhere, “Photography is a disease for which there is no known cure.” ( – Author Unknown)  I know I’m afflicted by it and I sure hope it isn’t fatal . . . . . aside from my wife wanting to kill me for exceeding my photography budget! 🙂 

A couple of days ago I “reacquired” the Sony NEX-7. There’s a lot to love there:  A beautiful, black, metal body; 24 Megapixel APS-C sensor; 10 frames-per-second; Terrific EVF (Electronic ViewFinder); and the Tri-Navi control system to give you almost instant access to many of the camera’s functions.  This camera is very customizable with several buttons that can be re-configured to setup this camera to work the way you work.

Many of you may not want your camera setup exactly like I do and that’s okay. We’re all individuals and approach photography with different goals and techniques.  In fact, my settings change from time to time as my current photographic emphasis changes.  But, if you’re new to the NEX-7 or maybe just struggling with the overwhelming customization options, maybe this will help. Here’s how I have mine setup, at least for now.

First, in the Main Menu, go to Setup and about halfway down you’ll find the Function Settings. These are the settings that are accessible using the Function Button (next to the shutter button) and adjustable with the two top Control Dials and the Control Wheel (Tri-Navi Controls).
  • Function Settings 1 > Focus Settings
  • Function Settings 2 > White Balance Settings
  • Function Settings 3 > Creative Style Settings
  • Function Settings 4 > Custom Settings
  • Custom Settings 1  > DRO/Auto HDR (Having Auto HDR and Quality in Custom Settings means they are both accessible at the same place. And since I often shoot in RAW, this makes it easy to quick change to JPEG when I want to use Auto HDR.)
  • Custom Settings 2  > Quality
  • Custom Settings 3  > Picture Effect
  • Function Settings Start > Previous (this just takes me back to whatever I had last changed)
Next, with Soft Key A, go back into the Setup Menu, and select Custom Key Settings. These will change the function of several of the buttons on the back of the camera.
  • AF/MF Button > AF/MF control
  • Right Key Setting > Flash Mode
  • Soft Key B Setting > Focus Settings
  • Soft Key C Setting > Shoot Mode
  • Custom Settings > N/A unless you set Soft Key C to Custom Settings, then you will have several choice to add, here.
With this configuration, I almost never need to go into the camera’s extensive menu system to make a change while I’m shooting, which is a big deal for me since I do tend to change settings quite often.  The possibilities are so varied, that you’ll probably need to do some experimenting with different combinations to find what works best for you, but maybe this guide can give you a place to start.

Please comment and share with us how you have your NEX-7 setup – and why – so we all have the chance to learn another way of doing things.

In a recent blog post, I mentioned that I worked with Gary Friedman (www.friedmanarchives.com) to produce a comprehensive manual about the new Sony NEX-5R and NEX-6.  You can find that eBook about the Nex-6 / 5R at www.FriedmanArchives.com , plus other books about all of the Nex models including the Nex-7, the RX100/M2 and most of the Sony Alpha models.

Wirelessly Tether your NEX-5R (or Nex-6) to your iPhone

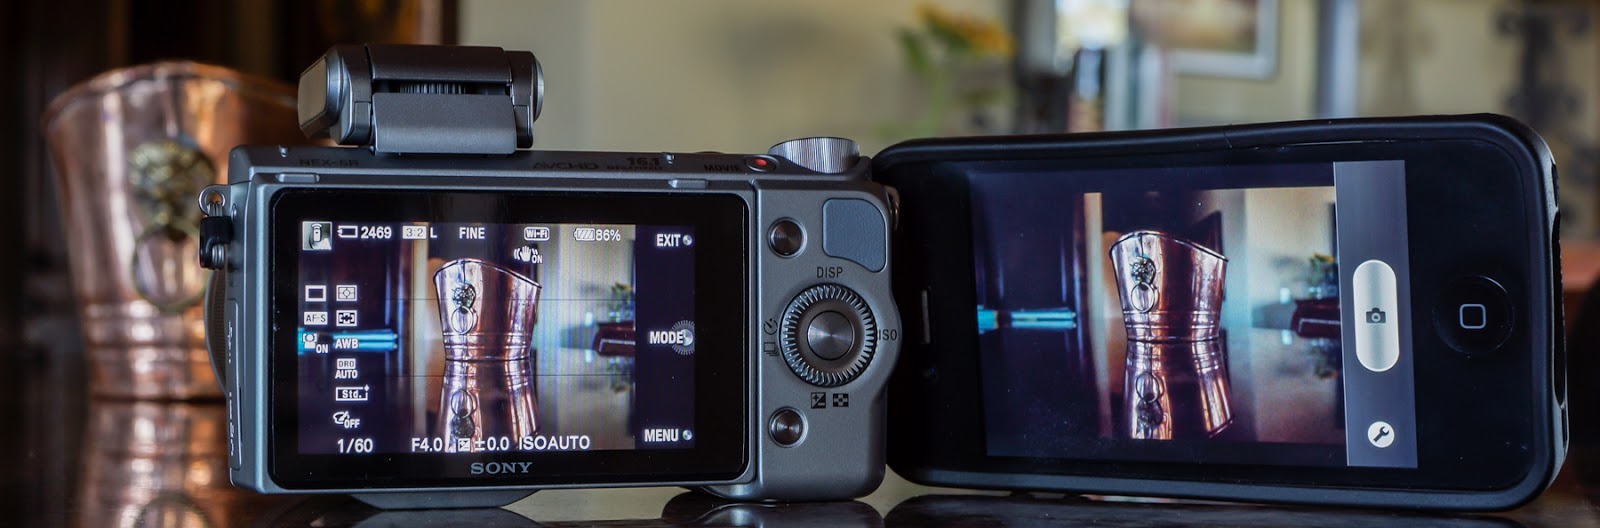
Sony-NEX-5R ready to shoot a copper pot with the iPhone wirelessly tethered. 

So you’ve got a brand new Sony NEX-5R (or NEX-6) and you own a smart phone.  Now, I bet you’re wanting to try out that “Smart Remote Control” thing by tethering your camera to your iPhone. This is such a cool capability … I know it was one of the first things I did after getting my NEX-5R. Below is an excerpt (draft) from a book I wrote about the NEX-5R and NEX-6, explaining how to get this “tethering” operation setup.
(The Ebook is available at: www.FriedmanArchives.com )
—————————

Once you’ve downloaded the PlayMemories app to your phone and the Smart Remote Control app to your camera, the next step is to setup a network connection between the iPhone and NEX. First, on the camera, select the Smart Remote Control app. Next, on the iPhone, go to Settings > Wi-Fi, where you will select the camera and enter a password provided for you by the camera (you should only have to do this once). With the camera “network” selected, start the PlayMemories Mobile app on your phone and soon the phone should see what the camera sees! Cool!

There will be a typical phone shutter button showing and a “Wrench” icon. Push the shutter button and the camera takes the photo, saving it to your phone (if you choose to). Press the Wrench icon and you are taken to a small menu where you can adjust the exposure compensation +/- 3EV, set a 2 Second timer, and choose between “Review, Save Image”, “Review Only”, and “Off”.
·       Review, Save Image allows you to review the image on your phone while also saving it to your phone.
·       Review Only just lets you review the image, but does not save it to your phone. Don’t worry, it is still saved to the memory card on the camera.
·       Off lets the phone get ready to shoot the next image with viewing or saving.

One nice thing is that you can switch back and forth between using the phone shutter button and the camera shutter button and the connection should still be fine.  Unfortunately, a “not-so-nice” thing is that every time you leave the app you first have to go back to Wi-Fi Settings, reselect the Camera, and back to your phone to reestablish the network connection and then restart the PlayMemories Mobile app.

I did get the connection to work up to a distance of about 30 feet (line-of-sight). On the down side, the whole operation, while a very cool capability, is also a bit wonky in use. Sometimes it took several tries to connect even from just a few feet. And if you leave the camera app at all, you have to go through the connection process again – except for the network password which it does remember.

Note: The camera got very warm while left in Smart Remote Control for several minutes and it seemed to drain the battery faster – nothing scientific in this – just an impression.

After the initial setup is complete, here are some basic steps for getting back into the Smart Remote Control mode: (These are iPhone instructions.)
·       On the camera, go to MENU > APPLICATION > Smart Remote Control.
·       Go to your Phone Settings > Wi-Fi > DIRECT-(series of letters)
·       Now, wait for your phone to recognize the camera network and select it.
·       On your phone, open the PlayMemories Mobile app.
·       In a few seconds the phone should see what the camera sees.
Shoot away! 🙂

Paranoia … it’s Alive and Flourishing!

Most of you wouldn’t be familiar with these lyrics:  “Paranoia strikes deep, into your life it will creep …”.  It was from a popular song written in 1966 by Buffalo Springfield called For What It’s Worth, but it still rings true, today, as I found out in a local grocery.

I live in a relatively small neighborhood and sometimes I take my camera out for a walk.  Often, I’ll stop by one of the local stores to see what’s interesting, photographically speaking.  What I like about the super markets is they have great lighting and are full of all kinds of detailed patterns and bright colors – perfect for photography.  And the one I frequent most seems to be struggling because there are almost never very many people there so it just makes it easier to take photos relatively unimpeded … usually.

This morning was different.  I was wandering around snapping a few photos, some of their “secret” stuff like apples and apricots, when I was approached by a manager asking what I was doing.  So I told him and showed him the last few shots which were very colorful (apples) and competely benign – not incriminating in any way.  He said they have to be careful and on the “lookout” for competitors and/or journalists, but then was nice enough to tell me I was okay and maybe just ask in the future.  Okay, I guess I can understand that, but still ….

So, what is going on in our society?  I’ve noticed other times when people would look at me with that concerned frown on the their face as they wondered, “Who’s the guy with the camera and what is he up to?”  I’m not “up to” anything.  I’m just a photographer out looking for some interesting images.  If I were doing something nefarious, I wouldn’t use a nice camera, I’d use an 8MP iPhone, get great images and no one would ever know – or wonder.  Maybe it’s just that I look intimidating.  A 63 year old with a slight (very slight 🙂 paunch, grey hair, not tall and obviously not in great shape is a scary sight.  Yeah, that’s got to be it.  hehe.

I guess I’ll just start asking permission but then that makes me think of a couple of quotes:
“If you can’t take the answer, then don’t ask the question.”
“It’s better to beg forgiveness than ask permission.”

Y’all have a great day!

The apples and the balloons were shot with the Olympus OM-D E-M5, using the Panasonic Lumix 12-35mm f/2.8 lens.