REAL High Speed Sync Flash with the Fujifilm X100s

Modern digital cameras come with so many great features and generally inadequate manuals, making it difficult sometimes to really understand all of those features and how they can interact to produce great images.  And the Fujifilm X100s is no different … Except there is help available.  Tony Phillips at The Friedman Archives has written an extensive and comprehensive book to cover all of those features in detail.  Below is an excerpt from Chapter 1 in “The Complete Guide to the X100s” by Tony Phillips.

————————————————–


LEAF SHUTTER 

In the introduction to this book I told you I loved this feature.  For one, they are deadly silent – a pretty good feature for street and documentary photography.  More importantly, they allow the camera to sync with flash at much higher shutter speeds than a focal plane shutter can, entirely changing your ability to compete with ambient light.
FLASH – Real High Shutter Speed Flash Sync
Landscape photographers talk about the golden hour.  The hour around dawn, or dusk when light takes on an almost magical quality.  Paradoxically cameras are optimized for “normal” daylight, and yet images taken under those kinds of hard-light conditions seldom seem as wonderful as their counterparts shot in the golden hour (or under the influence of a photographer with a keen eye for light and the knowledge of how to achieve it from their equipment).
Until now, that is. The leaf shutter lens in your X100S will change your ability to compete with ambient light.  Add the in-built ND filter to the mix, and an external accessory flash or two, and you’ll find yourself balancing flash with daylight to achieve the most wonderful light in outdoor situations.
It’s all about light ratios in relationship to ambient light. The type of real high speed sync (RHSS) available with a leaf shutter is not at all like high speed sync (HSS) as you may know it.  There are limitations placed on flash power delivered using HSS, brought about by the way the flash power is output (pulsed) during the period in which the shutter is open.  These limitations not only do not apply with a leaf shutter and RHSS, you actually get more punch from your flash unit than you would if it were attached to a regular focal plane shutter camera.  This is a pretty big topic, and I discuss it in much more detail starting on page 367.  In the meantime, feel free to dial up your shutter speed to 1/1000th of a second, and head outdoors for some shooting.

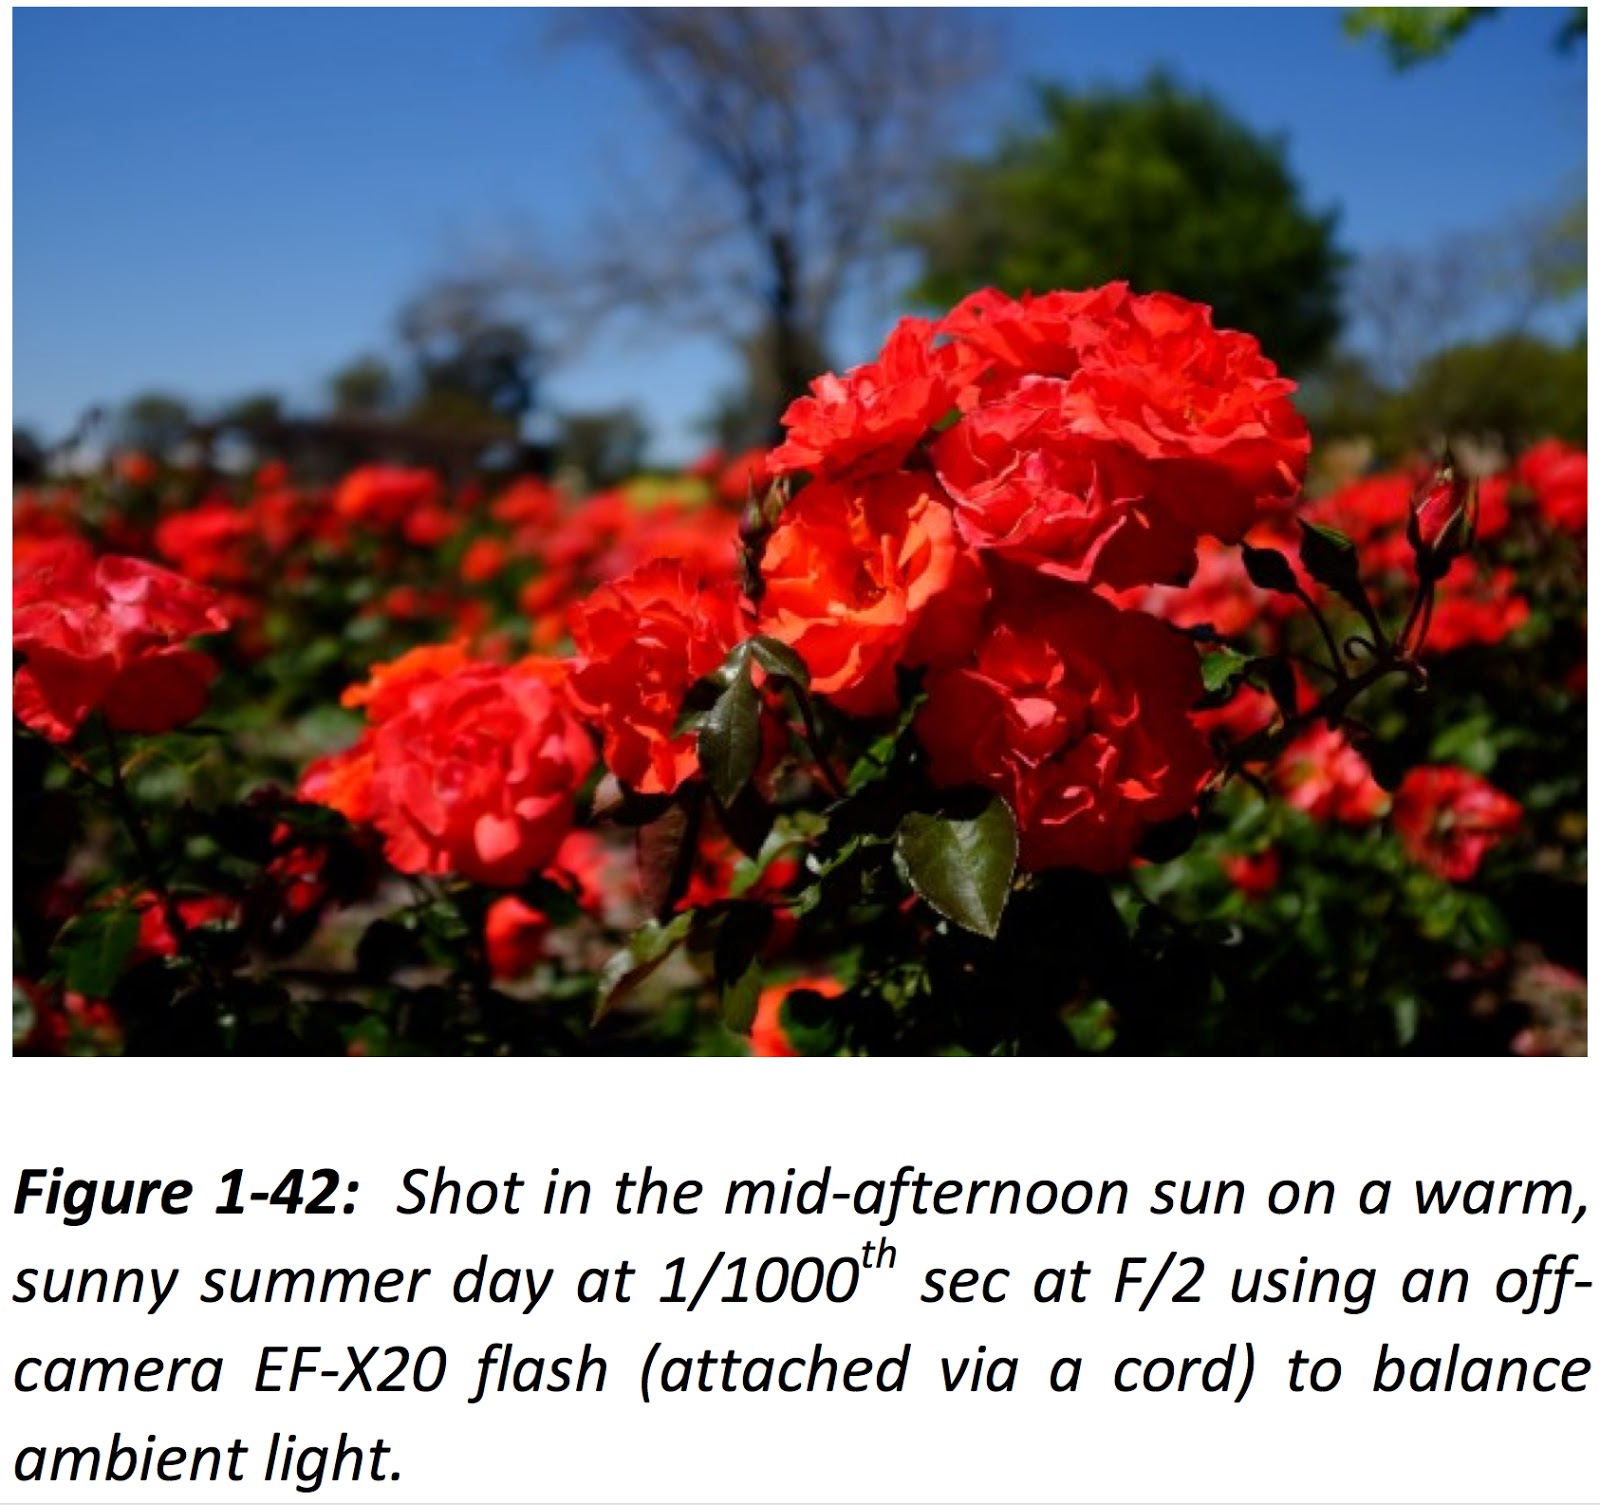
Want shallow depth of field with that?  Turn on the ND filter! Figure 1-42 demonstrates how this all comes together.  The high shutter speed (1/1000th) cuts ambient light giving me rich colours in the sky and trees.  The ND filter means I can shoot wide open (f|2 in this case) so only the cluster of roses in the foreground is in focus.  Add in the EF-X20 flash for some fill, and you produce a pleasing result in awkward lighting conditions.
————————————————–
So, for more great tips and techniques (almost 500 pages worth) head over to The Friedman Archives and check out Tony’s great book that can transform your understanding of the X100s and help you get great images from your camera.
In the interest of full disclosure, I need to tell you that I have also written for The Friedman Archives. I co-authored the book about the Sony Nex-6 and helped Gary Friedman with the Olympus OM-D E-M1 book.

Olympus OM-D E-M1 RAW … What Works … What Doesn’t

Like many of you, I prefer to shoot in RAW.  The well established reason is that it gives me more information to work with in post processing … more latitude in “tweaking” the image if necessary.  My second choice (when I have to) is RAW + JPG.  It’s a second choice because then I have twice as many files to deal with plus, it sucks up more memory on my SD card and on my computer.  But, of course, some cameras in some cases force you to shoot JPG.

The Olympus OM-D E-M1 actually does a pretty good job of automatically changing the image quality setting to one that is compatible with whatever camera function you’ve selected … but, not always.  In Gary Friedman’s recently released, excellent book about the E-M1, you will find a table showing you how the camera behaves with different settings.  So, below you’ll find a short excerpt from his book that will hopefully clear up what the camera does in those different situations.

———————————————————————————–
Excerpt from “The Complete Guide to Olympus’ OM-D E-M1” by Gary L. Friedman

The E-M1 offers many advanced bells-and-whistles, which are not all compatible with RAW mode. And the ones that don’t support RAW, will (sometimes) silently switch to RAW+JPG (LF) shooting while you use them and then switch back when you’re finished. Which features are incompatible with RAW, and how does the camera behave for each? A comprehensive table appears below:

So, here’s what you really have to remember … a RAW file is always a RAW file and few of the fancy camera settings (except exposure, of course) will apply. The camera may show you the effect in the EVF/LCD, but the RAW file will NOT record that effect. So for those cases where the camera does not automatically switch to RAW+JPG, it is only showing you a preview of what the effect “could” look like.
Fortunately, the Olympus editing software, Olympus Viewer 3, will let you apply all of the in-camera effects to a RAW file on your computer, after the fact. Those include Art Filters, Picture Modes, Color Creator, and Highlight & Shadow Control.

————————————————————————-
You can find a great selection of camera and photography books at The Friedman Archives.


Visit Myanmar with National Geographic Photographer, Michael Yamashita


I don’t write posts like this very often, however there’s a very special opportunity to travel to an exotic location and shoot under the guidance of a National Geographic photographer, and I thought you might be interested. 🙂  AND a price break is on the horizon – I’ll explain more about that in a minute.

The exotic Location is Myanmar (formerly known as Burma) in Southeast Asia, and the photographer is Michael Yamashita, who holds the esteemed record of having shot for National Geographic longer than any other photographer.  This November, Michael and fellow adventure travel photographer Jock Montgomery will be leading a photo expedition to this picturesque country rich in history and devotional beauty.

There are three things that make this event noteworthy:

1)    Unlike most tour groups, this event is organized to accommodate the unique (some say eccentric) needs of the photographer – places will be visited when the light is good, pre-sunrise excursions will be planned to make sure you’re in the right place at the right time.  You’re free to roam around and explore.  
2)    Unlike most internationally famous photographers, Mike Yamashita is one of the most down-to-earth and approachable human beings you could ever hope to meet.  Plus, for you Sony shooters, that’s what Mike shoots with, too!  🙂
3)    This a supportive environment for doing serious cultural documentary photography.  There won’t be any family members rolling their eyes and saying “Hurry up – how many pictures do you have to take of that?”. 

The trip will occur from November 9th21st, with an optional 5-day extension from Nov 21.-25th.  You can read more about at one of these two links:

For web browsers: http://www.compassroseexpeditions.com/Photo_Tours/2014-11/Myanmar_Photo_Tour/#p=1

For other platforms like mobile phones: http://www.compassroseexpeditions.com/Photo_Tours/2014-11/MYM-NOV2014.pdf

Now, about that price break…

The pricing of the trip is structured so that the more people sign up, the less it is for everyone.  For example, the price for the basic package drops from $7200/person to $6800/person after 9 people sign up.  AS OF THIS WRITING, EIGHT PEOPLE HAVE SIGNED UP so if you sign up now you’ll be very, very popular with the rest of the group (and you’ll save yourself some money as well.)

That’s it.  If you’d like to learn more here are some sources for you:

•    Images from a similar trip in January:   http://www.compassroseexpeditions.com/slideshows/2014-11_Myanmar/ 
•    http://www.compassroseexpeditions.com/slideshows/Myanmar_Portraits/ 
•    http://www.compassroseexpeditions.com/slideshows/Myanmar_Inle_Fishermen/ 
•    Want to sign up?   Send Jock an email at jock@jockmontgomery.com and tell him “Mike Hendren sent me!”

And if you go … you have to promise to write a guest post (with photos) to share with the readers of Thru Mikes Viewfinder.  🙂


Sony Nex-6 (5R and 5T) Setup

The Nex-6 is still selling amazingly well on Amazon, so there must be a lot of new users out there.  If you are and you’re struggling with setting up your brand new Nex-6, then maybe I can help.  A little over a year ago, in collaboration with Gary Friedman at the Friedman Archives, we published a comprehensive e-book about the Sony Nex-6/5R/5T.  Below, you’ll find a short section from the book with a table that will hopefully clarify the available options for you.
———————————————————————
The Nex-5R and Nex-6 boast the ability to reassign (“customize”) a couple of the buttons to help cater the camera to your specific needs. Here’s where new owners get into a tizzy since there are so many options it makes the camera harder to get to know than it should be. I’ve been playing around with different settings over the past few months, and I’ve arrived at what I consider an optimal configuration – and for me, “optimal” means “My most-accessed features are only one or two button-presses away, and that for most field shooting situations, I’ll never have to access the menus ever again!
I’ve outlined those settings in the table below. The table shows all of the settings that are available for each button, the camera default settings from the factory, and the settings I’ve used for my camera.  Of course, most of you will develop your own personal settings, but this might be a good place to start.

** On the NEX-6, if the LCD screen is on the “For Viewfinder” screen, then pressing the Fn Button gives you immediate access to 16 different camera functions, which you can then change their settings. Sony calls this the “Quick Navi” screen. You can’t change which functions appear there, but it is such a complete list there’s really no need. (More on this on page 150 in my book).

# These functions are also already available with other keys on the camera’s Control Wheel.

If this helped and you’d like to see more, just head over to www.FriedmanArchives.com where you’ll find the e-book available at a reasonable price.  And even more reasonably, it comes with a money back guarantee.

My Digital Early Days – Part 1 – Nikon Coolpix 5000 and Canon D30

Argus C44 35mm Film Camera
I’ve been interested in photography for almost my entire life, beginning in the mid 1960s when my dad bought a 35mm Argus C44 … wow, fifty years ago!  From that I progressed to a nice SLR the Minolta SRT101 and then a Canon EOS Elan.  Then on January 8, 2002, I jumped into digital photography and have never looked back.
My first digital camera was the Nikon Coolpix 5000.  But that didn’t last long.  The battery life was terrible, unacceptable to me.  However, it could produce nice results as you can see from the photo of Molly, our Beagle, who loved to lay on the heater vents on those cold January days.  The Nikon was 5 Megapixels, which was a lot for that time, especially considering it was in a small sensor point and shoot.  But I decided to go a different route, so the next day I took the Coolpix back to the camera store and traded up to a Canon D30.
San Francisco on a foggy morning.   Taken from the cockpit, shortly after takeoff.
The D30 only had 3 Megapixels and cost nearly $3,000.  That was a lot of money “way back” in 2002!  🙂  But it was a great camera and I ended up keeping it for almost two years, carrying it with me on trips (I was a Captain for Delta Air Lines) and vacations.  Again, the image quality was excellent and the files would still be considered excellent for what most of us do with images these days … i.e., put them on the internet.
The next camera in my “digital history” was the Canon 10D, but we’ll save that for another time.  For now, here are a couple more photos from the D30.
Sailboat reflection on a calm morning.

Lighthouse on Elbow Cay, near the Bahamian island Abaco.

Friedman’s E-Book about the E-M1 is Available!

The e-Book about the Olympus OM-D E-M1 was released by +Gary Friedman , over at The Friedman Archives.  Gary has been writing great books about Sony cameras for years, and has now finally decided to branch out and start writing about these wonderful Olympus cameras.
(NOTE:  You’ll also find a book about the Fuji X100s and an upcoming book about the Fuji X-T1.)
If you’ve read any of Gary’s previous books, you’ll be happy to know he brings the same level and depth of understanding and coverage to this book.  If you haven’t read any of his previous work, then you’ll be pleasantly surprised to find not only complete coverage of the camera and all of it’s functions, but also a ton of excellent general photography tips.  Plus, he writes in an informal and easy reading style.
Here are some of what he’s said about the book on his website:

The OM-D E-M1 camera has been hailed as “The King of Micro Four Thirds” format for good reason! The engineers gave this camera one of the most customizable and nuanced user interfaces ever. While a good move, even experienced users will sometimes need help getting their arms around all of the different permutations of features or groups of features spread across different menus.

In this detailed and easy-to-read reference, professional photographer Gary L. Friedman simplifies the complexity and provides the shortest learning curve for this infinitely-configurable camera.”
When you order one of his e-Books, you get all three versions:  A full color .pdf file, a .mobi version for Kindle, and an .epub file for Nook or other e-reader.  There are print versions available, too, but at an extra cost, of course.
Plus, he has a money-back guarantee, so you really have nothing to lose.


Light Painting is Easy with the Olympus OM-D E-M1 (E-M5 and E-M10, too)

The Olympus OM-D E-M1 (and E-M5, E-M10) were made for Light Painting.  They give you a feature not found on any other camera that I know of, and that is Live Bulb / Live Time.  Using either of these allows you to watch your image develop in Real Time (almost like developing prints in a dark room back in the “good old days”).  And then you can end the exposure when you think it looks right.

Light Painting is not only easy but a lot of fun and it can yield some unique images for you.  Basically it entails setting up in a relatively dark location so you can use a longer shutter setting, long enough to give you time to selectively illuminate your subject to achieve your desired result.
I won’t go into details here because I wrote about it twice last year.  First using the Fujifilm X100, and later with the Olympus PEN E-PL1.  I not only talk just a little about technique but point you to some great websites about it, too.

The beauty of using this technique with the OM-D is centered in two features known as Live Bulb and Live Time.  (The settings for these two are found in Custom Menu E.)  In a nutshell, these two functions tell the camera to periodically update the live view on the LCD monitor, allowing you to track the exposure in “almost” real time.  Then when it looks right … you end it.
The menu settings allow you set the desired interval for the camera to update the live view, but keep in mind the number of updates is limited.  So you need to space them out to make sure it will cover your needed exposure time.  Also the higher the ISO, the lower the number of allowed updates.

My favorite of the two modes is Live Time for one simple reason.  It lets you start the exposure with a simple press of the shutter button and then end it the same way.  With Live Bulb, you must hold the shutter button down (or use a cable remote with locking ability) for the entire time.

Previously, getting a good exposure while light painting was a function of luck, experience, and trial and error.  Now, with the Olympus OM-D E-M5, we have a tool that can greatly shorten the learning curve and help you get the best exposure the first time.  🙂

By the way, if you’d like more about the nuts and bolts of these features (and Much more), take a look at Gary Friedman’s comprehensive new book about the Olympus OM-D E-M1, available in just a few days at The Friedman Archives, www.friedmanarchives.com