Wireless Flash with Your Sony Nex-7 – using the Pop-Up!

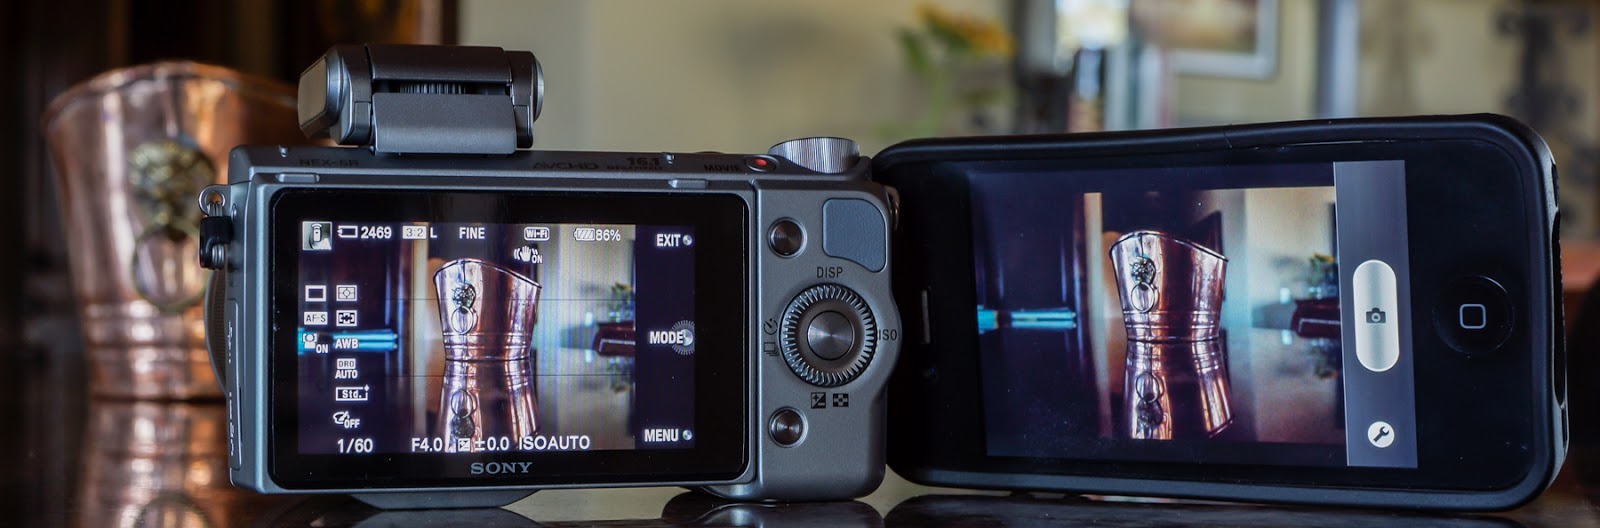
The Sony Nex cameras are known for their excellent wireless flash capability.  But did you know you could make it work with the built-in Pop-Up flash?

The “normal” way to do wireless is to use at least two external Sony flashes like the older HVL-F20AM ($128) as a trigger and the new HVL-F43M ($398) as a slave. (I still haven’t seen anything to indicate that the new HVL-F20M can function as a wireless trigger.)  So there you are $526 into it … a bit expensive for my blood.

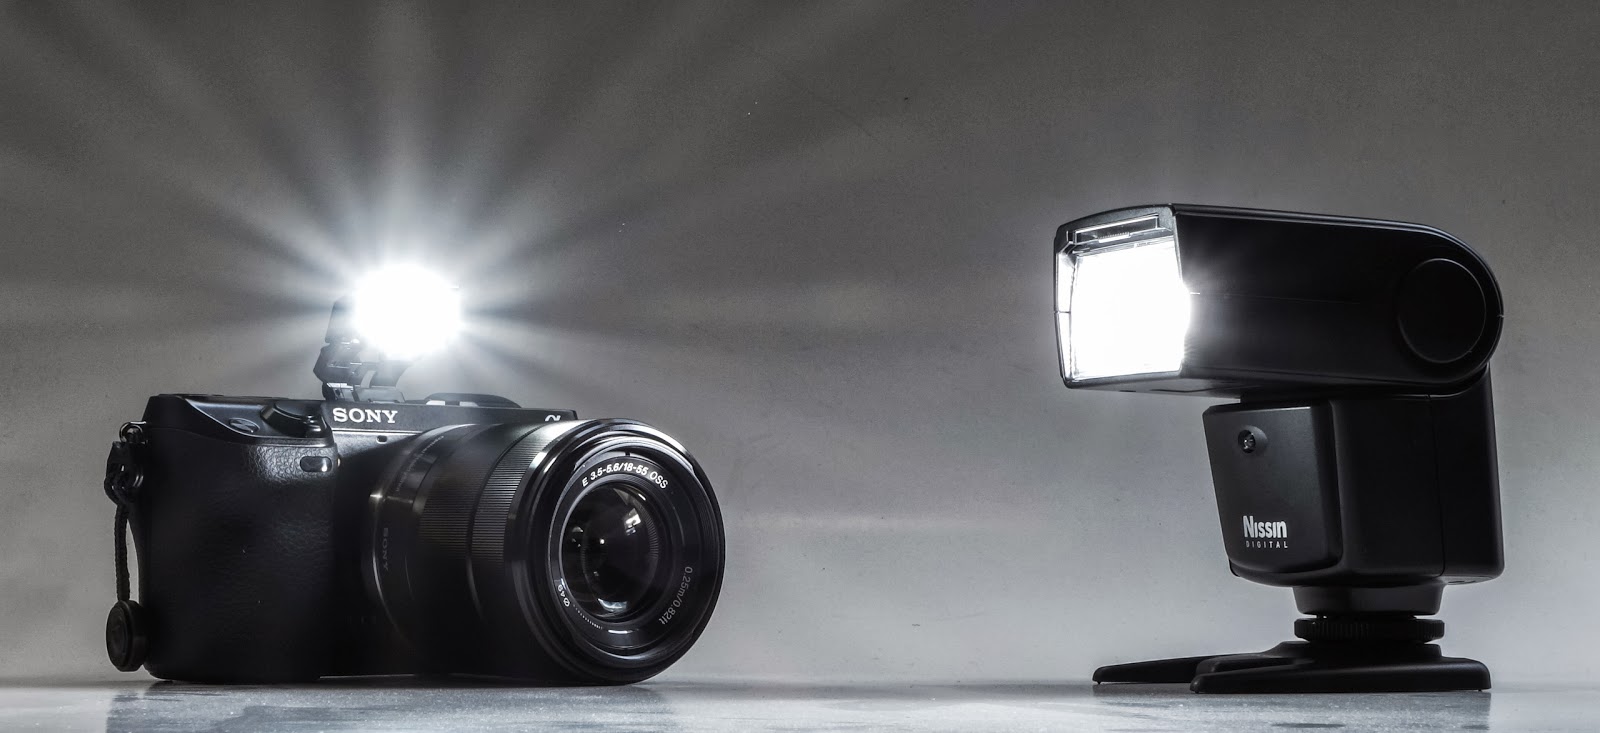
Well, I just discovered that the Nissin Di466 ($138.50 on Amazon) can function as a remote flash while using the Nex-7’s pop-up flash.  Very cool!  I actually got this flash to use with the Olympus OM-D E-M5 and it is advertised to be compatible with Olympus and Panasonic Four Thirds cameras.  On those cameras it will also work “on camera” whereas with the Sony it will not.  Still, $140 for a wireless flash “system” sure sounds better than almost $530!  🙂

One caveat:  The Nissin will not work in TTL mode like this so you must shoot in manual flash.  The camera can be in any mode that will fire the pop-up flash, but you may need to adjust the Nissin’s output.

It’s so easy, too.  Just pop-up the camera’s flash, set the Nissin appropriately and fire away.  You don’t even need to change the flash mode to wireless (actually, it’s not even available).

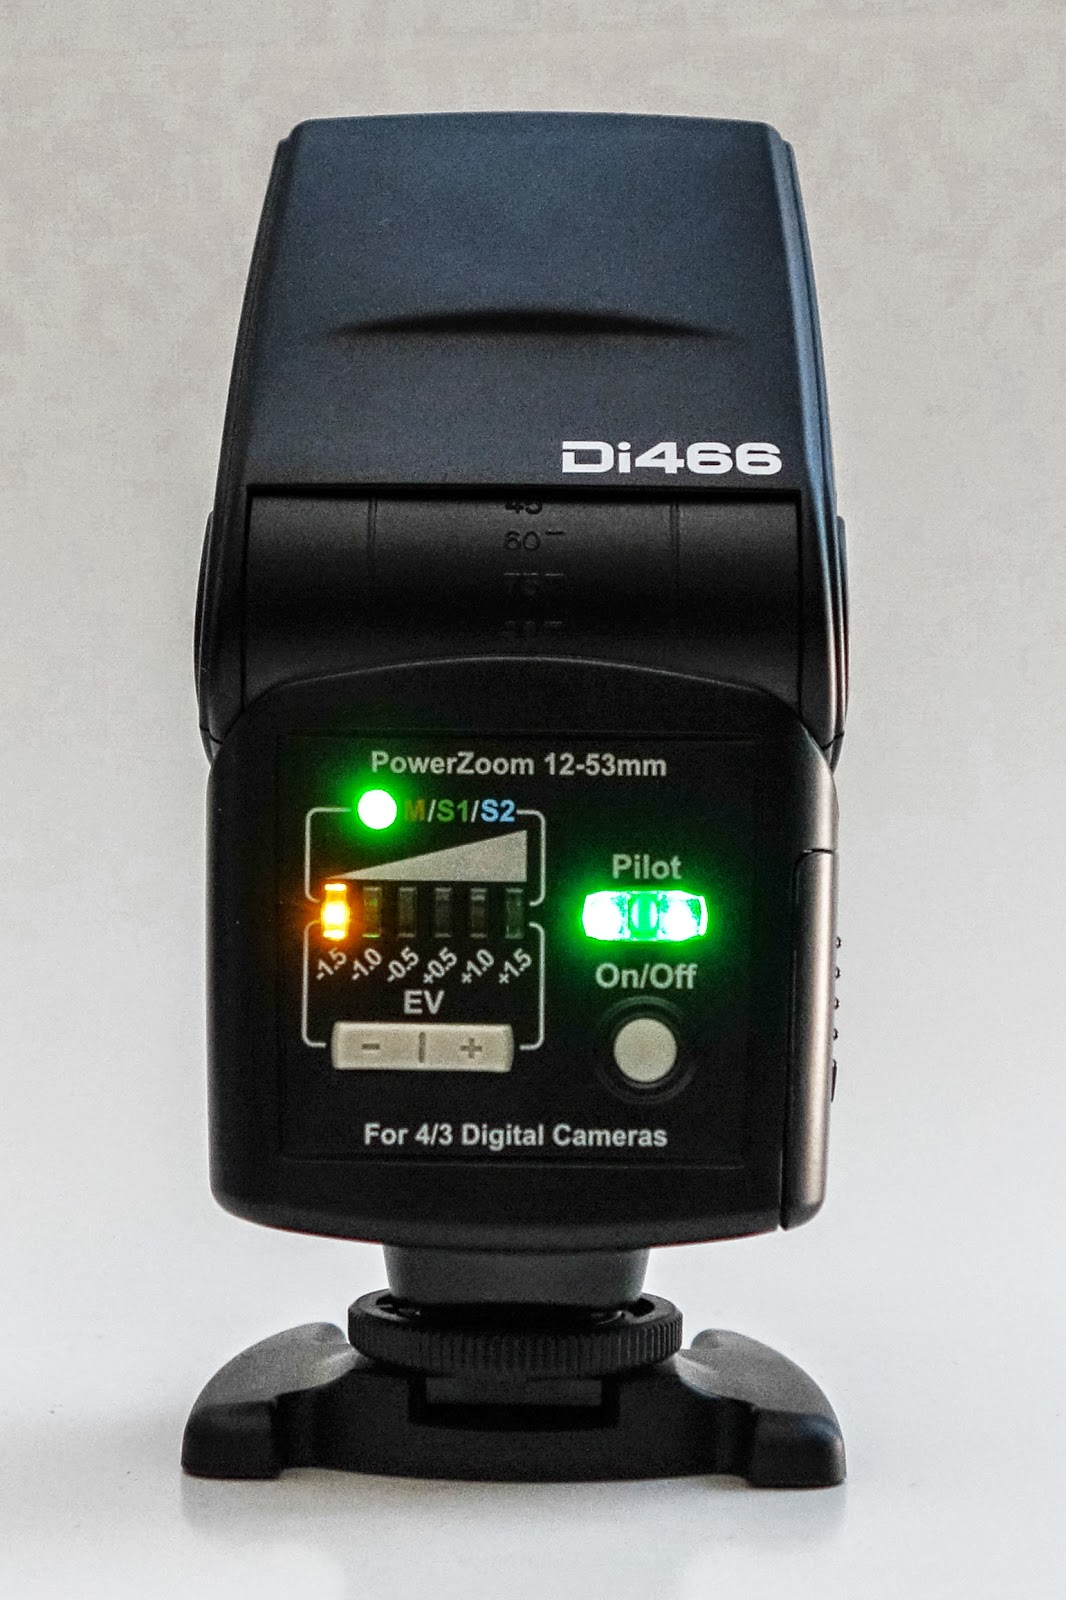
I’ve had the Nissin Di466 for a few months and it has worked great.  It has simple controls and excellent recharge times with good batteries (4 AAs required).  There only four buttons and three indicator lights so it’s a piece of cake to use.  There’s an On/Off Button and the Pilot Button/Light which shows its “ready to fire” status and also doubles as a test flash button.  Then there’s an exposure compensation Rocker Switch which you use to either compensate exposure or set the manual exposure value.  The other tiny button lets you switch between Auto, Manual, and Slave (two modes, S1 and S2).  With the Nex-7, I use S1 so it knows to fire when it sees a flash and doesn’t try to communicate with the camera.

There is another advantage to using this flash for wireless … it fires almost instantaneously when you press the shutter button.  As good as Sony’s system is, there is one slight problem.  When using Sony flashes in a remote operation, there is a delay of approximately 1/2 to 1 full second from the time you press the shutter until the photo is actually taken.

Good results on a budget just aren’t all that hard to accomplish if you just look around a little bit and see what’s available.

Note:  This flash will probably fire wirelessly with just about any camera and flash.  I got it to fire by just using another flash (off camera) and doing a test fire and … boom … it fired!

As always, your comments and suggestions are greatly appreciated and please feel free to “Fav”, “Tweet”, and “+1 or share” on Google+ or anywhere else.
     Thanks,
          Mike

Setting Up the NEX-7 – Revisited

I recently read somewhere, “Photography is a disease for which there is no known cure.” ( – Author Unknown)  I know I’m afflicted by it and I sure hope it isn’t fatal . . . . . aside from my wife wanting to kill me for exceeding my photography budget! 🙂 

A couple of days ago I “reacquired” the Sony NEX-7. There’s a lot to love there:  A beautiful, black, metal body; 24 Megapixel APS-C sensor; 10 frames-per-second; Terrific EVF (Electronic ViewFinder); and the Tri-Navi control system to give you almost instant access to many of the camera’s functions.  This camera is very customizable with several buttons that can be re-configured to setup this camera to work the way you work.

Many of you may not want your camera setup exactly like I do and that’s okay. We’re all individuals and approach photography with different goals and techniques.  In fact, my settings change from time to time as my current photographic emphasis changes.  But, if you’re new to the NEX-7 or maybe just struggling with the overwhelming customization options, maybe this will help. Here’s how I have mine setup, at least for now.

First, in the Main Menu, go to Setup and about halfway down you’ll find the Function Settings. These are the settings that are accessible using the Function Button (next to the shutter button) and adjustable with the two top Control Dials and the Control Wheel (Tri-Navi Controls).
  • Function Settings 1 > Focus Settings
  • Function Settings 2 > White Balance Settings
  • Function Settings 3 > Creative Style Settings
  • Function Settings 4 > Custom Settings
  • Custom Settings 1  > DRO/Auto HDR (Having Auto HDR and Quality in Custom Settings means they are both accessible at the same place. And since I often shoot in RAW, this makes it easy to quick change to JPEG when I want to use Auto HDR.)
  • Custom Settings 2  > Quality
  • Custom Settings 3  > Picture Effect
  • Function Settings Start > Previous (this just takes me back to whatever I had last changed)
Next, with Soft Key A, go back into the Setup Menu, and select Custom Key Settings. These will change the function of several of the buttons on the back of the camera.
  • AF/MF Button > AF/MF control
  • Right Key Setting > Flash Mode
  • Soft Key B Setting > Focus Settings
  • Soft Key C Setting > Shoot Mode
  • Custom Settings > N/A unless you set Soft Key C to Custom Settings, then you will have several choice to add, here.
With this configuration, I almost never need to go into the camera’s extensive menu system to make a change while I’m shooting, which is a big deal for me since I do tend to change settings quite often.  The possibilities are so varied, that you’ll probably need to do some experimenting with different combinations to find what works best for you, but maybe this guide can give you a place to start.

Please comment and share with us how you have your NEX-7 setup – and why – so we all have the chance to learn another way of doing things.

In a recent blog post, I mentioned that I worked with Gary Friedman (www.friedmanarchives.com) to produce a comprehensive manual about the new Sony NEX-5R and NEX-6.  You can find that eBook about the Nex-6 / 5R at www.FriedmanArchives.com , plus other books about all of the Nex models including the Nex-7, the RX100/M2 and most of the Sony Alpha models.

Wirelessly Tether your NEX-5R (or Nex-6) to your iPhone

Sony-NEX-5R ready to shoot a copper pot with the iPhone wirelessly tethered. 

So you’ve got a brand new Sony NEX-5R (or NEX-6) and you own a smart phone.  Now, I bet you’re wanting to try out that “Smart Remote Control” thing by tethering your camera to your iPhone. This is such a cool capability … I know it was one of the first things I did after getting my NEX-5R. Below is an excerpt (draft) from a book I wrote about the NEX-5R and NEX-6, explaining how to get this “tethering” operation setup.
(The Ebook is available at: www.FriedmanArchives.com )
—————————

Once you’ve downloaded the PlayMemories app to your phone and the Smart Remote Control app to your camera, the next step is to setup a network connection between the iPhone and NEX. First, on the camera, select the Smart Remote Control app. Next, on the iPhone, go to Settings > Wi-Fi, where you will select the camera and enter a password provided for you by the camera (you should only have to do this once). With the camera “network” selected, start the PlayMemories Mobile app on your phone and soon the phone should see what the camera sees! Cool!

There will be a typical phone shutter button showing and a “Wrench” icon. Push the shutter button and the camera takes the photo, saving it to your phone (if you choose to). Press the Wrench icon and you are taken to a small menu where you can adjust the exposure compensation +/- 3EV, set a 2 Second timer, and choose between “Review, Save Image”, “Review Only”, and “Off”.
·       Review, Save Image allows you to review the image on your phone while also saving it to your phone.
·       Review Only just lets you review the image, but does not save it to your phone. Don’t worry, it is still saved to the memory card on the camera.
·       Off lets the phone get ready to shoot the next image with viewing or saving.

One nice thing is that you can switch back and forth between using the phone shutter button and the camera shutter button and the connection should still be fine.  Unfortunately, a “not-so-nice” thing is that every time you leave the app you first have to go back to Wi-Fi Settings, reselect the Camera, and back to your phone to reestablish the network connection and then restart the PlayMemories Mobile app.

I did get the connection to work up to a distance of about 30 feet (line-of-sight). On the down side, the whole operation, while a very cool capability, is also a bit wonky in use. Sometimes it took several tries to connect even from just a few feet. And if you leave the camera app at all, you have to go through the connection process again – except for the network password which it does remember.

Note: The camera got very warm while left in Smart Remote Control for several minutes and it seemed to drain the battery faster – nothing scientific in this – just an impression.

After the initial setup is complete, here are some basic steps for getting back into the Smart Remote Control mode: (These are iPhone instructions.)
·       On the camera, go to MENU > APPLICATION > Smart Remote Control.
·       Go to your Phone Settings > Wi-Fi > DIRECT-(series of letters)
·       Now, wait for your phone to recognize the camera network and select it.
·       On your phone, open the PlayMemories Mobile app.
·       In a few seconds the phone should see what the camera sees.
Shoot away! 🙂